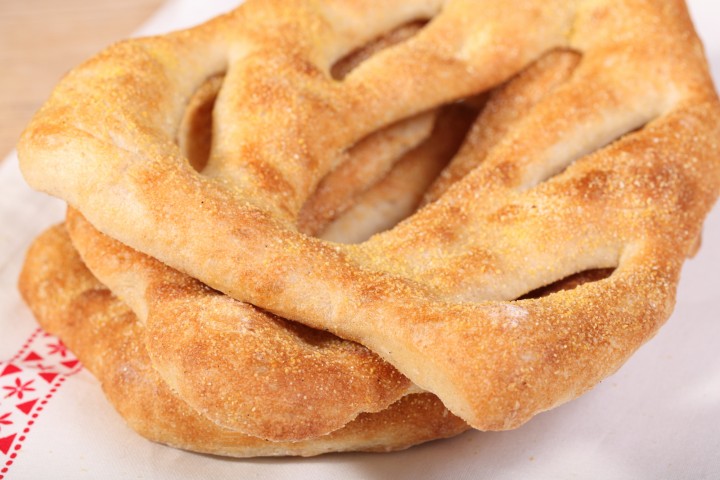
Fougasse was traditionally used to assess the temperature of a wood fired oven
Klik hier voor de NL versie
For a while now, we have been having fun making the fougasse (The ‘French Provence version’ of the Italian focaccia, also a flatbread but still different in many ways).
This bread and the crust to crumb ratio is just perfect to accompany all kinds of spreads, dips and soups.
This is basically a straight yeast dough, but to add some more taste and interesting texture we add a little extra to it. For starters we add a poolish to the dough, next we use a combination of flours and we also add some semolina to the crust before baking. You can make a plain version or you can make a version with the optional extra bits in the shape of juicy green garlic olives and sun blushed tomatoes. The green and red speckles give the bread a colorful and festive appearance. You can also make your own ‘tapenade’ with the olives and tomatoes and serve this with the fougasse. Delicious!
And the baking of the fougasse takes no more than 12 minutes, so satisfyingly quick too. After the baking all you have to do is share and dip and enjoy!

Phase one: Making the poolish
To make this a one day recipe we make the poolish late in the morning and leave it to ferment for 4 to 6 hours. If you do not want to make the poolish or forgot you can add the ingredients to the final dough and use 7 grams of instant yeast instead of 5. But we highly recommend to schedule it in, it takes just a minute to make it!
Ingredients for the Poolish
150 g bread flour
50 g whole wheat flour
200 g water
1 g instant yeast
Make the poolish by mixing flour, water and yeast with a spatula or dough whisk until well combined (about 30 seconds), cover the bowl with clingfilm and leave to develop at room temperature for 4 to 6 hours.

Phase two: Making the fougasse dough
Ingredients for the fougasse dough
makes 4 pieces of fougasse
the poolish from step one
300 g bread flour
8 g sea salt
5 g instant yeast
approx 120 ml water, lukewarm
100 g finely chopped green olives and semi dried tomatoes (optional)
semolina flour for dusting the dough and peel
In the bowl of a standing mixer combine flour, salt, instant yeast and the poolish. Add the water and start mixing. Knead the dough for 7 minutes (10 to 15 minutes by hand, depending on your technique). When done it should be slightly sticky, sticking to the bottom but not to the sides of your bowl. You can add the optional pieces of olive and dried tomato at the last minute of the kneading or you can fold them in later after you shaped the dough into squares. Cover and leave to rest for 30 minutes. Now give the dough a stretch and fold in the bowl by pulling the dough up from different sides and folding it over itself. Cover and again leave to rest for 30 minutes.
Now transfer the dough onto a floured work surface and divide and shape into 4 equal square pieces. The pieces should each be around 17 x 17 cm / 6.7 x 6.7 inches. Cover the pieces and leave to rest for 20 minutes.
Preheat your oven to 250 °C / 480 °F.
Prepare bread peels with a coating of semolina so you can easily shoot the fougasse into the oven or prepare a baking sheet if you are going to use that instead.

Take a piece of dough and lay it on the peel or the baking sheet, one point of the square pointing at you. Richly sprinkle the dough with semolina. Now take a small dough scraper or a credit card and make cuts in the dough. One big cut lengthwise and two smaller cuts on each side and stretch them a bit to open the cuts (see pictures). Repeat this process with the other pieces of dough.
Take the fougasse to the hot oven and try to create some steam immediately after the bread is placed on the stone.
Bake for 12 minutes and aim for a deep golden color. Take out of the oven and put on a cooling rack. Eat them fresh with all kinds of tapas, dips and mezzes, soups and stews. The fougasses also keep well in the freezer and are almost as good as fresh if you give them a minute in your toaster.


Marco says
Ik was uiteindelijk vergeten om wat stoom in de oven te maken, en omdat het deeg wat moeilijk hanteerbaar was, had ik er maar eentje die er mooi uitzag. De drie andere waren… nou ja, een beetje zielig om te zien. Maar wat geeft dat allemaal als het resultaat zo heerlijk is. Ik heb ze gemaakt bij een geïmproviseerde pompoensoep met chipotlepepers. Wat een zalige structuur heeft dat brood; dank voor weer een heerlijk bakrecept!
Weekend Bakers says
Hallo Marco,
Excuses voor de late reactie, maar je hebt helemaal gelijk! En die soep gecombineerd met de pepers, dat inspireert ons ook om aan de slag te gaan, want we zijn dol op beide!
Heel veel bakplezier de komende maanden bij de warme oven, met en zonder stoom…
Groetjes,
Ed & Marieke
Sammie Zhang says
Hi,
I don”t know whether I can ask you here or not but I have a question about the haussler mixer. I got mine couple months ago and I really love it except the cover and I remember that you said you took yours off. Would you mind telling me how you did?
By the way I love your blog and made breads following your recipes specially sourdough bread. Thank you so much for your wonderful blog.
Sammie
macro calculator says
I love the internal cuts. It really gives it some elegance! It’s used for just dipping bread or some other way?
Rianne says
Bedankt! Ga ik morgen bij mijn miches nog beter opletten. Ben dus duidelijk te voorzichtig geweest met platdrukken. Beantwoord meteen de vraag wat betreft zuurdesem. Ik doe niet anders en ik heb dankzij jullie tips een geweldig zuurdesem tot mijn beschikking.
De pitabroodjes heb ik een keer geprobeerd maar ik denk dat ik die te lang heb gebakken. Tandenbrekend zal ik maar zeggen :). Ik zat te wachten op het opbollen wat niet kwam. Maar nu, in mijn nieuwe oven, ga ik het zeker nog eens proberen!
Groetjes
Rianne
Weekend Bakers says
Succes Rianne, het gaat vast en zeker lukken met je nieuwe oven. De pitabroodjes moeten inderdaad kort maar heftig in de oven, hoe heter en korter hoe beter!
Veel bakplezier!
Marieke
Jaye Deete says
Rianne: When you roll out the dough for pita, be sure to coat the disks on both sides with much flour. Then gently rub the flour into the dough. This forms a skin on the outside of the pita disk, which helps contain the steam, thereby puffing the pita.
Rianne : Als je het deeg uitrollen voor pita , zorg ervoor dat de vacht van de schijven aan beide kanten met veel bloem. Dan wrijf de bloem in het deeg . Dit vormt een huid aan de buitenkant van de pita schijf , waardoor de stoom bevatten , waardoor de Pita puffen .
(The Dutch is a Google translation.)
Rianne says
Hoi Ed en Marieke,
ik had graag een commentaar achter gelaten bij de kaneelbroodjes de Luxe maar helaas, ik zie geen mogelijkheid daartoe. Maar daar ik jullie toch graag wil laten weten, hoe blij ik ben dat ik jullie site gevonden heb, hier dan maar even een berichtje.
We zijn aan het genieten op dit moment van mijn eerste zelf gebakken luxe “koffiebroodjes”. Wat een heerlijkheid aan geuren en smaken. En dat, terwijl wij geen suiker eten, en ik daar dus een alternatief voor heb gebruikt. Ieder gemaakt recept is tot nu toe een succesvolle verrassing, dus daar sowieso al bedankt voor.
Maar van dit specifieke recept werd ik vooral heel blij, omdat ik onderaan de tip vond om de dag ervoor het deeg al te maken, waardoor je veel minder gist hoefde te gebruiken. Daar dat nog een ingrediënt is wat ik zoveel mogelijk probeer te vermijden, een top tip dus. Zo kunnen wij toch genieten van een ware traktatie. Super! Als je nog meer van dat soort tips bij recepten kunt zetten, ben ik jullie heel dankbaar. Moet ik nog wel nog meer gaan bakken… oei, wat erg :)))
Het recept voor de miche heb ik vorige week ontdekt. Mijn experimenten om de verhouding bloem/volkoren meel in het tarwe volkoren recept aan te passen meteen in de kast gezet. Er stond al een heerlijk echt volkoren recept op de site. En ook dat is perfect.
Nog wel een vraagje over de broden. Hoe voorkom ik dat er echt enorme gaten ontstaan? Soms bestaat een halve snee bijna uit een gat, dan valt (bij wijze van spreken ;)) die hagelslag zo gemakkelijk van je boterham.
Ga vooral zo door. Jullie enthousiasme en geweldige uitleg werkt zeer inspirerend!
Groetjes en een fijn weekend!
Rianne
Weekend Bakers says
Hallo Rianne,
Dank voor je ontzettend leuke feedback op het recept. Vergeten een vinkje te zetten bij de koffiebroodjes voor de comments zagen we net. Excuses daarvoor.
Fantastisch dat de recepten en tips zo goed bevallen!
En over de grote gaten: Wil je een wat fijner kruim dan is het zaak wat langer te kneden en met name het deeg goed te ontluchten (plat drukken) en daarna op te bollen. Hopelijk gaat het hiermee lukken.
We blijven graag inspireren. Misschien ben je ook al eens met zuurdesem aan de slag gegaan? Zo niet, dan is dit recept heel leuk om eens mee te beginnen, vooral als je geen of weinig gist wilt gebruiken: www.weekendbakery.com/posts…abroodjes/
Nog heel veel bakplezier en lekkere en mooie broden,
Ed & Marieke