

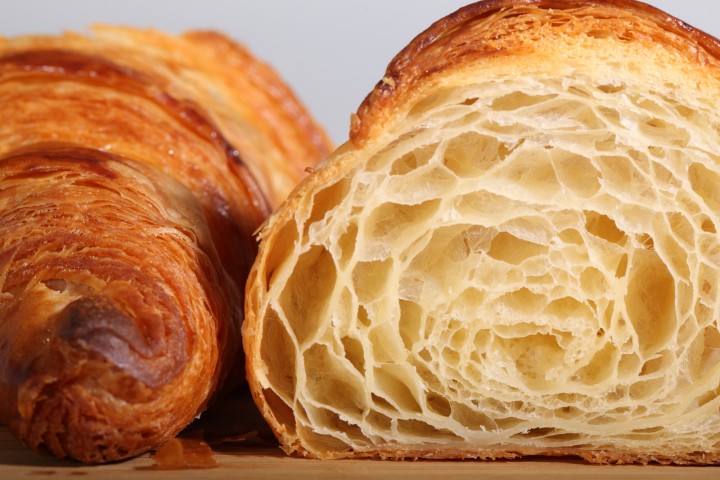
It’s all about the layers…
Klik hier voor Nederlandse versie
With this recipe we want to give you the exact directions on how we go about making classic French croissants. The recipe is an adaptation from the recipe for Classic Croissants by Jeffrey Hamelman. We started out largely following the instructions for his recipe, changed everything to our beloved metric system and found out some worthwhile croissant knowledge of our own along the way. Hopefully enough to justify sharing it all with you and inspiring you to give croissant baking a shot yourself.
Before you start we can recommend watching our croissant making video to get a general feel for the recipe. You can also check out our croissant making log where we keep track of our own croissant baking adventures. For answers to your croissant questions you can check out the Frequently Asked Croissant Questions section.
This recipe will yield about 15 good croissants plus some leftover bits which you can use to make a few, slightly odd shaped ones, or other inventive croissant-like creations.
If at first you don’t succeed, maybe you can take comfort from the fact that our first efforts were not very ‘croissant worthy’. But as you can see we persevered and got better…But we have to admit it is and always will be a tricky process. You have to work precise and be focused to get good results. So away with screaming children, hyperactive animals and all other things distracting! Put on some appropriate croissant making music and lets get to it…
Please read the following tips;


According to Raymond Calvel croissants laminated with margarine are formed into the crescent shape, while croissants laminated with butter are left in the straight form. We say, use whichever shape you like best, but do use butter!
The croissant recipe

Ingredients for the croissant dough
500 g French Type 55 flour or unbleached all-purpose flour / plain flour (extra for dusting)
140 g water
140 g whole milk (you can take it straight from the fridge)
55 g sugar
40 g soft unsalted butter
11 g instant yeast
12 g salt
Other ingredients
makes 15
280 g cold unsalted butter for laminating
1 egg + 1 tsp water for the egg wash
Day 1
Making the croissant dough
We usually do this part in the evening. Combine the dough ingredients and knead for 3 minutes, at low to medium speed, until the dough comes together and you’ve reached the stage of low to moderate gluten development. You do not want too much gluten development because you will struggle with the dough fighting back during laminating. Shape the dough like a disc, not a ball, before you refrigerate it, so it will be easier to roll it into a square shape the following day. Place the disc on a plate, cover with clingfilm and leave in the fridge overnight.


Day 2
Laminating the dough
Cut the cold butter (directly from the fridge) lengthwise into 1,25 cm thick slabs. Arrange the pieces of butter on waxed paper to form a square of about 15 cm x 15 cm. Cover the butter with another layer of waxed paper and with a rolling pin pound butter until it’s about 19 cm x 19 cm. Trim / straighten the edges of the butter and put the trimmings on top of the square. Now pound lightly until you have a final square of 17 cm x 17 cm. Wrap in paper and refrigerate the butter slab until needed.


Take the dough out of the fridge. With a rolling pin roll out the dough disc into a 26 cm x 26 cm square. Try to get the square as perfect as possible and with an even thickness. Get the slab of butter from the fridge. Place the dough square so one of the sides of the square is facing you and place the butter slab on it with a 45 degree angle to the dough so a point of the butter square is facing you. Fold a flap of dough over the butter, so the point of the dough reaches the center of the butter. Do the same with the three other flaps. The edges of the dough flaps should slightly overlap to fully enclose the butter. With the palm of your hand lightly press the edges to seal the seams.

Now the dough with the sealed in butter needs to be rolled out. With a lightly floured rolling pin start rolling out, on a lightly flour dusted surface, the dough to a rectangle of 20 x 60 cm. Start rolling from the center of the dough towards the edges, and not from one side of the dough all the way to the other side. This technique helps you to keep the dough at an even thickness. You can also rotate your dough 180 degrees to keep it more even, because you tend to use more pressure when rolling away from you than towards yourself. You can use these techniques during all the rolling steps of this recipe. Aim at lengthening the dough instead of making it wider and try to keep all edges as straight as possible.
Fold the dough letter style, cover with clingfilm and refrigerate for 30 minutes (fold one third of the dough on top of itself and then fold the other side over it). Repeat the rolling and folding two more times (ending up with 27 layers of butter in total), each time rolling until the dough is about 20 cm x 60 cm. After each fold you should turn the dough 90 degrees before rolling again. The open ‘end’ of the dough should be towards you every time when rolling out the dough (you can see this in our croissant making video at around 3:40 minutes). After the second turn, again give it a 30 minute rest in the fridge. After the third turn you leave the dough in the fridge overnight until day 3, the actual croissant making day!
- Roll out to 20 cm x 60 cm
- Fold
- Refrigerate 30 minutes
- Rotate 90 degrees
- Roll out to 20 cm x 60 cm
- Fold
- Refrigerate 30 minutes
- Rotate 90 degrees
- Roll out to 20 cm x 60 cm
- Fold
- Refrigerate until day 3
- Rotate 90 degrees
- Roll out to 20 cm x 110 cm
Also see complete time table at bottom of page


Day 3
Dividing the dough
Take the dough from the fridge. Lightly flour your work surface. Now very gently roll the dough into a long and narrow strip of 20 cm x 110 cm. If the dough starts to resist too much or shrink back during this process you can fold it in thirds and give it a rest in the fridge for 10 to 20 minutes before continuing. Do not fight the dough, when the dough refuses to get any longer, rest it in the fridge! It is such a shame to ruin two days of work.
When your dough has reached its intended shape, carefully lift it a few centimeters to allow it to naturally shrink back from both sides. This way it will not shrink when you cut it. Your strip of dough should be long enough to allow you to trim the ends to make them straight and still be left with a length of about 100 cm.


Shaping the croissants
For the next stage you will need a tape measure and a pizza wheel. Lay a tape measure along the top of the dough. With the wheel you mark the top of the dough at 12,5 cm intervals along the length (7 marks total). Now lay the tape measure along the bottom of the dough and make a mark at 6,25 cm. Then continue to make marks at 12,5 cm intervals from this point (8 marks total). So the bottom and the top marks do not align with each other and form the basis for your triangles.
Now make diagonal cuts starting from the top corner cutting down to the first bottom mark. Make diagonal cuts along the entire length of the dough. Then change the angle and make cuts from the other top corner to the bottom mark to create triangles. Again repeat this along the length of the dough. This way you will end up with 15 triangles and a few end pieces of dough.

Using your pizza wheel, make 1.5 cm long notches in the center of the short side of each dough triangle.
Now very gently elongate each triangle to about 25 cm. This is often done by hand, but we have found that elongating with a rolling pin, very carefully, almost without putting pressure on the dough triangle, works better for us. You can try both methods and see what you think gives the best result.
After you cut a notch in the middle of the short end of the triangle, try and roll the two wings by moving your hands outwards from the center, creating the desired shape with a thinner, longer point. Also try and roll the dough very tightly at the beginning and put enough pressure on the dough to make the layers stick together (but not so much as to damage the layers of course).

Proofing and baking
Arrange the shaped croissants on baking sheets, making sure to keep enough space between them so they will not touch when proofing and baking. Combine the egg with a teaspoon of water and whisk until smooth. Give the croissants their first thin coating of egg wash. You do not need to cover the croissants with anything, the egg wash will prevent the dough from drying out.
Proof the croissants draft-free at an ideal temperature of 24ºC to 26.5ºC / 76ºF to 79ºF (above that temperature there is a big chance butter will leak out!). We use our small Rofco B20 stone oven as a croissant proofing cabinet by preheating it for a minute to 25ºC / 77ºF. It retains this temperature for a long time because of the oven stones and isolation. The proofing should take about 2 hours. You should be able to tell if they are ready by carefully shaking the baking sheet and see if the croissants slightly wiggle. You should also be able to see the layers of dough when looking at your croissants from the side.


Preheat the oven at 200ºC / 390ºF convection or 220ºC / 430ºF conventional oven.

Right before baking, give the croissants their second thin coat of egg wash. We bake the croissants in our big convection oven for 6 minutes at 195ºC / 385ºF, then lowering the temperature to 165ºC / 330ºF, and bake them for another 9 minutes. Hamelman suggest baking the croissants for 18 to 20 minutes at 200ºC / 390ºF , turning your oven down a notch if you think the browning goes too quickly. But you really have to learn from experience and by baking several batches what the ideal time and temperature is for your own oven. Take out of the oven, leave for a few minutes on the baking sheet, then transfer to a cooling rack.
Latest way of baking; We heat up our double fan big convection oven at 200ºC, when heated up put the croissants in the oven and directly lower it to 175ºC. We bake them for 10 minutes at 175ºC, they will have a nice brown color by now, then lower the temperature to 150ºC, and bake them for another 6 minutes.
Best eaten while warm and fresh of course. Croissant we don’t eat or share within a day we freeze. We put them in the preheated oven (180ºC / 355ºF) for 8 minutes straight from the freezer. Nothing wrong with that, croissants eaten nice and warm, almost as good as the fresh ones…almost!
Croissant Time Table
Times are an indication and also depend on your experience with the recipe
Try to work swift but precise and take extra fridge time if needed!
Day 1 – Make initial dough
- 21.00 h – Knead for 3 minutes and store in fridge for 12 hours
Day 2 – Laminate the dough
- 09.00 h – Make butter slab and refrigerate till needed
- 09.05 h – Roll dough disc into square
- 09.10 h – Seal butter in dough
- 09.15 h – Roll out to 20 cm x 60 cm and fold
- Refrigerate 30 minutes
- 09.50 h – Rotate 90 degrees
- Roll out to 20 cm x 60 cm and fold
- Refrigerate 30 minutes
- 10.25 h – Rotate 90 degrees
- Roll out to 20 cm x 60 cm and fold
- 11.00 h – Refrigerate until day 3
Day 3 – Dividing, Shaping, proofing and baking
- 09.00 h – Roll out to 20 cm x 110 cm – part 1
- 09.05 h – Often needed! Take 20 min. fridge time if length not in one go
- 09.25 h – Roll out to 20 cm x 110 cm – part 2
- 09.30 h – Divide and shape the croissants
- 09.40 h – First coat of egg wash
- 09.45 h – Proof to perfection (indication 2 hours)
- 11.45 h – Second coat of egg wash
- 11.50 h – Bake for 15-18 minutes
- 12.10 h – Ready!


Michael Beligiannis says
What to feel for when you take that laminated dough out of the fridge, how do I know the consistency i right when rolling the dough out. Do you have any tips and tricks for that? Doesn’t letting the dough rest in the fridge over night make the butter to hard to roll out?
In your written explanation you say to pop it in the refrigerator for 30 min. between each fold, but in the video it says rest in the freezer for 20 min. which is by your opinion the better alternative?
Than you for your site and thorough explanations I love it.
Michael
Weekend Bakers says
Hello Michael,
The first time, when you take it out (depending on fridge temp and surroundings) it will feel a bit like a hump of dough, but you should start rolling immediately. After this first rolling the dough should begin to feel smoother and after repeating the process the dough will become more silky smooth. You cannot wait too long because the butter will too soft or even leak. So, as a rule, you should always start immediately after taking the dough out of the fridge.
When we made the video, we did use the freezer, but now we use the fridge, which works very well for us here in Holland. Depending on the temperature both options are valid. In hotter climates the freezer would be a good option.
So the rest is practice and gaining experience, but that is also the fun part.
Good luck with it and happy croissant baking!
Liew says
Hi , my croissant tear off and lose it shape at the end of the proofing. What is the possible reason?Is it because the gluten is not strong enough to hold it shape ?
How can I overcome this problem ?
Thanks
Weekend Bakers says
Hello Liew,
We do not know what type of flour you have used. What was the protein content?
patrick says
Hi. please can you share with us the recipe of the Sausage Roll` pies if you have one I will really appreciate that any one please I will send you the feed back thank you
Very much fellows
Regards
Patrick nzuza
Weekend Bakers says
We only have this recipe fro sausage rolls (Dutch style) made with bread dough: www.weekendbakery.com/posts…spice-mix/
You can also use the recipe for rough puff pastry (quick puff pastry) from this recipe:
www.weekendbakery.com/posts…ff-pastry/ and fill this pastry with a sausage filling, also very good.
Sara says
Thank you so much! I have enjoyed this recipe so much! My husband was elated after returning home from a week-long work trip. I have a single-fan convection oven. I had to adjust the temperature here in the states to about 350 for 30 minutes or so. I kept a close eye. I definitely learned a lot with all of the conversions but we were more than pleased with the outcome. Thank you again! I believe I now have a new hobby. Best wishes.
Weekend Bakers says
Hi Sara,
Thank you for your wonderful feedback! Great you found a prefect way to make the recipe your own with satisfying results. And how great is that, making your family happy by enjoying your hobby. We love it!
Happy croissant baking and a very good weekend,
Ed & Marieke
patrick says
Thank you very much about this recipe I have tried is very good I brought one from Germany I like this is good
Regards
Patrick nzuza
Weekend Bakers says
Thank you Patrick, a croissant from Germany can also be very good!
David Burnett says
Thank you so much for this website and video. I have tried at least 20 batches of croissants and have experienced most of the problems. The one I could not overcome was a lack of honeycomb structure inside (either bready, or thick layers of bread).
Reading and watching this has helped me solve my problem and now I have light airy croissants for the first time in a year.
The solution was using more flour ( I was scared too much flour would make it bready) and gently rolling. I was using a lot of force and destroying may of the layers and causing the butter to melt too fast. The outside still had layers but the inside layers were pretty much eradicated.
Weekend Bakers says
Thank you David, for sharing your experience with us. Looks like you have found the right balance!
Helen says
Thank You for this really good full of detail post 🙂 I made mine today. First time and I think came out ok. A bit fat, but really soft. Can You tell why 1-2 of the croissants stayed completely smooth? Picture of them is on my instagram 🙂
Best
Weekend Bakers says
Hi Helen,
Great to see your result. We do not really have an idea as to your question. We do see you added lots of other items / filling to the croissants recipe, so this will have an impact on the baking result.
Ana says
Hello bakery in the weekend! It is the first time I have the recipe, I have a problem. The mass later to have amassed church 3 times, I have dated visible pieces of butter, what I do? How do you avoid it?
Weekend Bakers says
Hi Ana,
We do not fully understand your question, maybe because of translation?! Please make sure you use the right type of butter like we say in the introduction of the recipe and make sure the butter has the right consistency (not too hard or soft but pliable) when using it.
Jenny says
This is the 4th time I’m trying to make croissants. I am actually using Paul Hollywood’s recipe with 300g of butter rather 280g in the one you posted above but with no butter in the dough. I have a question on the baking technique: Do you think it is necessary to create steam in the oven by having a shallow tray of hot water at the bottom of the oven?
I’ve read that adding steam in the oven creates better crust but I’m not sure if a croissant would need that
Thank you!
Weekend Bakers says
Hello Jenny,
I can tell you that we do not add steam when baking croissants, we do not think it is necessary and baking time and oven temp are more essential. But it could be that in your case and with your oven your croissants could benefit from steam. But it is essential that the temperature of your oven does not drop at the beginning of the baking process, so if you are using steam you may want to adjust your temp to just a bit higher, because the baking time should not be longer because of the addition of steam and the oven needing to ‘get up to speed’ again to the correct temperature. If possible, try both options and judge the difference in result.
djamila says
Hi there,
I have tried your croissant two times, and the first time turned out good but the second time I tried them they were even better. I wanted to thank Weekend Bakery for all the steps and techniques that have helped my croissant to turn out good. If I could ask for a favor, I would like to know if it is possible to show us how to make the chocolate croissant as well. Thanks a lot..
Weekend Bakers says
Hi Djamila,
Thank you very much for your kind words. We will take into account what you ask, but we are a bit busy at the moment, so it may take a while. But is is really very easy, you can add the chocolate (just 10 grams is enough) to the croissant or you can make them with a square piece of dough. You can see pictures of them in our croissant log: www.weekendbakery.com/posts…aking-log/
Happy croissant baking!
Chithra says
Excellent blog! Thanks for the detailed write-up on croissant making. Iam definitely trying it this weekend. I tried one ( followed a different recipe) last weekend but was not happy with the result.
Can you please tell me what ,and by how ,much needs to be changed if using active dry yeast instead of the instant yeast in your recipe? Thanks!
chithra says
Hello! I went ahead and tried the recipe over the weekend without waiting for a response.
Used the same amount of active dry yeast in place of instant yeast.I should say my second attempt at croissant making was muuuch better than the first.
But certainly not there yet 🙂
I find it so difficult to work with the butter. It does not melt, but tends to not get incorporated into the dough as shown in your video or pics. It stands out separately inside the dough and rolling the dough gets difficult. The butter protrudes from the dough at some points and worst of all, i see lot of butter oozing out in the oven when baking.
I did get some layers in the croissant this time, but certainly not the best. And i can’t understand how your dough and butter becomes “one” in the pic/video & how the butter does not protrude out.Any inputs appreciated. Thanks a lot!
I want to try this again, but with reduced measurements since bad attempts with so much dough and butter wasted is not a happy situation. Can your recipe be halved?
Thanks again.
Chithra
Weekend Bakers says
Hello Chithra,
A bit too late but maybe for next time, when using active dry yeast instead of instant you can take the amount of instant and multiply it by 1.2 (so use just a bit more). But another ‘school’ says just to use the same amount, but take into account that active dry yeast needs a little more time than instant yeast, because it is considered a slow starter.
It is very important to use the right butter. Like we say in the intro of the recipe: We use an organic butter with a low water content, a higher water content tends to make butter hard, which promotes tearing and breaking and ruins the layers. The butter we use has written on the package ‘at least 82%’ butterfat.
Plus make sure the butter has the right consistency, same as the dough, when working with it, pliable and not too hard or soft.
Butter leakage in the oven can be caused by under-proofing so make sure your croissants are really well proofed, dare to go a bit further!
Yes you can divide the recipe in half. Keep in mind to do your calculations to match this. So If you want half then the dough should be 18.4 x 18.4 and the butter about 12 x 12. Same for the laminated dough, you should only make one side shorter, so end up with a 20 x 30 square.
Good luck with it!
chithra says
Thank you!! Appreciate it.
josephine says
Your responses, and your involvement with everyone who comments, are amazing!
I am a keen at-home artisan baker. With memories of that crisp crunch and soft crumb, and many European café stops in mind, I was looking for a true recipe for baguettes.
I found the recipe on your site, and it is now rising – in the cellar. *I am in Spain, and our daytime temperatures at the moment are averaging 35º.
Now I am looking avidly at these croissants – I think I will be making these at about 2 a.m., when the temperature drops to 29º.
Thank you/baie dankie for being so real in a world of ‘internet distance.’
Weekend Bakers says
Hello Josephine,
Thank you so very much for your praise, it means a lot.
When making the croissants keep in mind you can use the fridge even more than we indicate in the recipe, to cool whenever needed. You can also cool your tools and even flour and use if possible a cool work surface (stone, marble). But we do get comments and mail from bakers making and baking croissants in tropical places, which impresses us but also means it can be done.
best of luck with it and above all enjoy the baking!
Ed & Marieke
Rossella says
Dear weekend Bakery, I would buy an oven to bake croissants, brioche etc. I need your advice on buying … I thought of a steam oven, but do not know the best brands. For baking bread using Rofco and my cooking is fantastic, I realized many of your recipes and your tips are enlightening. I apologize for my English by automatic translator. Thank you very much.
Rossella
Weekend Bakers says
Hello Rossella,
For our croissants and other pastry we use a convection oven with two fans. The brand of our oven is ‘Euromax’ but we do not know if this is sold where you live. The good thing about an oven with two fans is the equal browning of the pastry. All the croissants look the same, no matter the place in the oven. We are very happy with the baking results we get with it. This oven has a steam function but to be honest we never use it, because we do not really need it with the good results we get.
Good luck with your oven quest.
Marieke & Ed
Maria says
Hello can we freeze the croissants and when is the best time to do it? Thank you in advance
Weekend Bakers says
Hello Maria,
Yes, you can and based on our own experience we would suggest proofing them for one hour before freezing. Get them out on time on baking day, because they need a lot more thawing and proofing until they are ready for the oven. Alternatively you can let them defrost overnight in the fridge and take it from there. Just make sure they are perfectly wobbly and well proofed before baking.
Good luck with it!
Nada says
Just made croissants , they are great . Taste is fabulous
Thank you the recipe and detailed explanation
Weekend Bakers says
Thank you for giving it a try and liking it Nada.
Happy croissant baking!
Tay sultan says
Hi,
Can I use this recipe in making puff pastry ? thank you.
Weekend Bakers says
Hi Tay,
You can use the lamination process as described. You make the same dough, but you leave out the yeast and sugar. There is no proofing involved of course, you can make it and use it in one day.
Gabby says
I love the taste
but i m wondering i keep trying using dough sheeter, the holes inside cant be as good as yours.
And the middle part is doughy and the croissant holes are terrible.
I ve followed your instruction and which part did i miss?
Weekend Bakers says
Hello Gabby,
We never use a sheeter, but we encourage you to try the recipe at least a few times as we describe it. If you read the comments right below yours, for Susan, a little further down for Nathan and others too, you will recognize the same challenges and all the tips and answers are hopefully useful to you too.
Susan Bohuslav says
Hi! I have hit a major croissant wall. I can’t get passed some problems I am having and was wondering if you could diagnose my mistake. I have a croissant that is very well layered, but dense. So when it bakes you get the kinda soft gooeyness and the crispy textures, but it doesn’t get very big and definitely lacks the big honey comb structure. I am rolling them to 4 2/3″ base x 9″ tall triangles (1/2″ thick) and the baked product is 4.5″ long. and flat. They kinda bake tall and then flatten out after I pull them out of the oven. The egg washed parts get dark and the side profile of the layers looks pale. I would greatly appreciate any suggestions you may have!
Weekend Bakers says
Hi Susan,
Either your baking times and temperatures are not correct, or your flour needs changing. It is hard to say what exactly goes a bit wrong without standing next to you. Try to use the convection setting of your oven if you have one and make sure your oven indicates the right temperature (see: www.weekendbakery.com/posts…your-oven/) If your croissants are the right color, temper your oven like we indicate and maybe bake them a bit longer. Make sure your croissants are well spaced, not too close together so the heat can reach everywhere. Try if possible to use a flour that comes close to the French type 55: see www.weekendbakery.com/posts…our-types/
Hope this helps and good luck with it!
David Burnett says
I was having the same problem. My issue was I was not using enough flour, and I was rolling too hard destroying all the layers.
Gabrielle says
Just made a double batch of these beauties and they turned out splendidly! Perfecto! This is my second time ever making croissants and these instructions are the best. I even made small ones out of the scraps and added some chocolate-delicious! The video was very helpful too. Thank you!!! I’m so pleased!
Weekend Bakers says
That sounds excellent, thank you! We always do something useful with the odd pieces of dough too. May we point you in the direction of other great recipes with the croissant dough?:
www.weekendbakery.com/posts…y-caramel/
Many more happy baking days!
Dimitris says
Hi,i’ve tried your recipe a few times.
Sometimes they turn out perfect,but sometimes the butter stays solid in little pieces that you can see inside the dough.
As a result there isnt butter everywhere and when i bake them all of the butter runs out..
My question.
Do you believe that this happens because the butter is way too cold?
Thanks.
Lior says
before you roll the dough with the butter for the first time, try to bring the dough and butter to the same consistensy, meaning: if the butter is too solid give it a minute or two at room temparatue or if the dough is too soft, cool the dough a bit longer to make the dough a bit more solid.
Weekend Bakers says
Thank you Lior, for this helpful addition.
Weekend Bakers says
Hi Dimitris,
We would like to add two things:
Make sure all the pieces of butter are fused together as one solid block of butter, when making the butter block.
Also, some butter types contain too much water, stay too hard and have a tendency to break. make sure you use the right butter (maybe you used different ones for different batches) with high fat content of around 82%.
Dimitris says
Thank you both for your answers.
I think that what Lior said was the problem as i’ve used the same butter (Lurpak) for all the batches.
Lior says
in Richard Bertinet’s book he adds a spark of lemon juice to the dough.
so my question is: with or without?
Weekend Bakers says
Hi Lior,
Both options are valid, it is a personal choice. When we tried it, we tasted the lemon in the dough and did not like that, but maybe we added a bit too much. Lemon does have a function in baking, it contains vitamin C and could work as a dough enhancer. The acid relaxes gluten, thereby decreasing elasticity and making it easier to roll out the dough. So in our recipe we did not use it, or found it necessary, but you could always test both options and see which version you like best or works best for you.
Happy croissant baking!
Erma Omolon perach says
detailed n satisfied of the video.i would love to do a test for myself.
Weekend Bakers says
Thank you Erma, let us know if and when you do!
Eff says
Hi guys!
Loved the video, instructions, pictures – everything about this post! I gave it a shot and while my croissants weren’t amazing by any standard, I was pretty pleased with my first go. Can’t wait to try again and improve on my laminating skills.
Here’s what they looked like 🙂
www.instagram.com/p/BHd…catepillar
Weekend Bakers says
Hi Eff,
That’s a more than excellent first result. You should be a proud baker. Thanks for sharing and happy croissant baking!
Nathan says
this is great but i have a question that sometimes my croissants come out the oven, outside they look crispy and golden brown but inside is raw and doughy, why did that happen? How could mine come out like you, crispy outside and light, airy, flaky and have many holes inside ? Please help me
Weekend Bakers says
Hi Nathan,
Without seeing the inside of your croissants we would guess that your lamination did not go completely as it should. Because you did not have all the layers the baking temperatures and time where not enough to bake the inside of your croissants. Try to carefully build up the layers without damaging them and without the butter melting / being absorbed by the dough. With practice and experience and maybe some more use of your fridge to cool the dough is necessary, it will improve.
Hope this helps you.
Mairah says
Beautiful and well explained croissant making i’ve ever seen! Will be making these for Eid next week in shaa Allah! I will let you know how they turn out! *fingers crossed*
Weekend Bakers says
Hi Mairah,
Take your time and read our instructions and tips before you start and hopefully it will be a great success!
Thomas An says
this is great but i have a question that sometimes my croissants come out the oven, outside they look crispy and golden brown but inside is raw and doughy, why did that happen? How could mine come out like you, crispy outside and light, airy, flaky and have many holes inside ? Please help me
Weekend Bakers says
Without seeing the inside of your croissants we would guess that your lamination did not go completely as it should. Because you did not have all the layers the baking temperatures and time where not enough to bake the inside of your croissants. Try to carefully build up the layers without damaging them and without the butter melting / being absorbed by the dough. With practice and experience and maybe some more use of your fridge to cool the dough is necessary, it will improve.
Hope this helps you.
- says
Hi, could you enlighten me on why sugar is needed to make croissants? Is it added for taste or does it play a role in a croissant’s structure and texture?
Weekend Bakers says
Hi,
It is added for taste, so it does not really have a function in structure and texture. You could leave it out or use half, which will have an impact on the taste of course.
Livia says
Hi! What type of sugar do you use in the recipe? I have Demerara cane sugar (light golden colour) at home, would that work or do I need to get caster sugar? Thanks! Livia
Weekend Bakers says
Hi Livia,
We use an organic sugar with a fine grain. If your sugar has a large grain then maybe it would be better to go and get the caster sugar, because the sugar has to dissolve into the dough. In general and based on our experience, we advice, especially when you are making croissants for the first time, to stick to the recipe as close as possible to get the best results and only make changes when you are comfortable with the recipe and can assess the impact of the changes you make. Because a lot of time, effort and ingredients go into making croissants and this way you will be most likely on the road to success.
Hope your croissants will be excellent!
Livia says
Hi Ed and Marieke, thanks for your reply! I’ve made the croissants (with caster sugar) and had the same problem as some previous posters: crispy outside and raw, doughy inside. I guess the lamination went wrong… I’ll try it again anyway, hopefully with better success! L
Weekend Bakers says
Hi Livia,
Yes, that could be the case. Like we said to Nathan in comment above: Because you did not have all the layers the baking temperatures and time where not enough to bake the inside of your croissants. Try to carefully build up the layers without damaging them and without the butter melting / being absorbed by the dough.
Hope and expect you will definitely improve when giving it a bit more practice.
Rima Sabbagh says
Very good but long winded
Weekend Bakers says
Soon we will be adding suggestions for different methods spanning one and two days. The amount of work will stay the same but the lead time will be shorter!
Ilma Marato says
Hello!
I’m Ilma from Sao Paulo – Brazil. I found your website last year, but Brazil is a tropical country and very difficult to reach low temperatures, so I had to wait the winter to make this incredible croissant recipe! I was wishing and hoping a strict winter with low temperatures and thanks God I got it!
So my first attempt I could have a really good result, and I’m very happy!
As here is very hard to obtain low temperatures I have a question about freezing croissants. Could I freeze my croissants without baking? I mean, after shaping the croissants, can I put in a bag for freezing or something like that?
Another question is, when you told “Day 1”, “Day 2” and “Day 3”, how many hours between the days, is it 24h?
I would like to thank you so much about this wonderful recipe!
Ilma Marato.
Weekend Bakers says
Hi Ilma,
Thank you for sharing, great to read! And yes, you can freeze the croissants after shaping. Just make sure you let them proof to perfection after you take them out. This may take a while, but take all the time you need.
And you can take 24 hours between the days, but it is also OK to make the dough on the evening of day one, laminate in the morning on day two and make the croissants the morning of day 3. You can also experiment with making them in two days, make the dough in the morning of day 1, laminate in the evening of day one and shape and bake on day 2.
Happy croissant baking,
Ed & Marieke
Ilma Alves da Silva Marato says
Hello Ed & Marieke!
Thank you for your return and tips! I will experiment both ways and share with you the results. If everything goes well, I will enjoy the winter and make a stock with a lot of croissants to all the year! 😉
Thank you so much!
Ilma Marato.
Weekend Bakers says
Sounds like an excellent plan 🙂
Enjoy!
Rosa Mary says
Its a beatifull recipe an look wonderful because its no easy make croissant very well instruccions. Thank you for your help
Weekend Bakers says
Thank you Rosa Mary! Happy croissant baking
Lefteris says
Hello,
i’m Lefteris from Greece . I tried to make the croissants but faced a problem and my first attempt was a disaster!! When i placed the butter in the dough and sealed it i tried to roll it but the butter started to come out the dough. I continued the whole process and finally the croissants i made were very heavy …In greece the temperature is high maybe that was the problem …what did go wrong?
thank you for your help!!
Weekend Bakers says
Hi Lefteris,
You describe a problem that many people face (see comments below) but can do something about by using the right type of butter (use real fresh dairy butter with 82 % fat content) the butter needs to be pliable but not too soft. But above all by using your fridge to help keep the dough cool enough when working it, placing it in the fridge more often to keep it cool. If needed you can even cool your tools and flour. Also make sue to work very precisely and that the dough is very well sealed. As you grow familiar with the recipe you will also work faster and the dough will not get so much chance to get too warm.
Good luck with it!
Cindy Morin says
I love the instructions and video. Thank you. What am I doing wrong if my croissants arent very flakey! They look beautiful and are not doughy in the centre, they are also very light but wonder about the lavk of flakiness.
Weekend Bakers says
Hi Cindy,
First of all it can have something to do with your ingredients, the type of butter and maybe flour. We use fresh dairy butter with a fat content of 82%. The butter needs to be pliable but not too soft, it must not be incorporated in the dough itself. Also the careful build up of the layers is something that needs practice.
Xarla says
Oh my !!! What a proses having a go though .
F.wilson says
Too much work,,,but I’ll definitely give it a go,,
Weekend Bakers says
Great to hear… and maybe do not look at it as ‘work’ but as something that is enjoyable with a reward waiting at the end of it!
Elie says
I have enjoyed making this recipe for almost a year now. Thank you for providing such detailed instructions.
If I were to make half a recipe, what dimensions should the dough and butter block be rolled out to? For example, if the original recipe calls for the dough to be rolled to 26x26cm and the butter block 17x17cm, should half a recipe be rolled to 13×13 for the dough and 8.5×8.5 for the butter? What about the laminated dough? Should it be 10×30 instead of 20×60?
Weekend Bakers says
Hello Elie,
The way you calculated the dimensions, you end up making 1/4 of the recipe, because you are making both the sides half the original length.
If you want half then the dough should be 18.4 x 18.4 and the butter about 12 x 12.
Same for the laminated dough, you should only make one side shorter, so 20 x 30.
Good luck with it.
Mikhail says
Thanks for the recipe; they turned out awesome. I have one question though, why does the dough have to take 3 days? I understand that the dough must remain cool enough to keep the butter hard and the dough cool but what else does the over night chill do? Could I expedite this process by rotations in the freezer or fridge to maintain a cool dough temp?
Thanks again!
Sujit says
Thank you chef I got your recipe of croissant still I have confusion with my preparing method or reciepe I want to know chef when I give my test that time croissant come good but last week I did very bad croissants I follow same as your given here but where I work in bakery temperature is above 3o degree so pls guide
Weekend Bakers says
Above all if possible try using your fridge to help keep the dough cool enough when working it, placing it in the fridge more often to keep it cool. If needed you can even cool your tools and flour. Also make sure to work very precisely and the dough is very well sealed. As you grow more experienced, you will also work faster and the dough will not get so much chance to get too warm.
Good luck with it!
Weekend Bakers says
Hi Mikhail,
The reason for the three days is the planning and develop taste and let the gluten relax. But it is possible to do it in two or even one day and yes you can use both the fridge and freezer to aid you. We are busy putting our one day version of the recipe online to show how we do it, and hopefully you will find it on our website soon.