


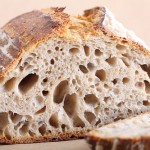
It’s all about the layers…
Klik hier voor Nederlandse versie
With this recipe we want to give you the exact directions on how we go about making classic French croissants. The recipe is an adaptation from the recipe for Classic Croissants by Jeffrey Hamelman. We started out largely following the instructions for his recipe, changed everything to our beloved metric system and found out some worthwhile croissant knowledge of our own along the way. Hopefully enough to justify sharing it all with you and inspiring you to give croissant baking a shot yourself.
Before you start we can recommend watching our croissant making video to get a general feel for the recipe. You can also check out our croissant making log where we keep track of our own croissant baking adventures. For answers to your croissant questions you can check out the Frequently Asked Croissant Questions section.
This recipe will yield about 15 good croissants plus some leftover bits which you can use to make a few, slightly odd shaped ones, or other inventive croissant-like creations.
If at first you don’t succeed, maybe you can take comfort from the fact that our first efforts were not very ‘croissant worthy’. But as you can see we persevered and got better…But we have to admit it is and always will be a tricky process. You have to work precise and be focused to get good results. So away with screaming children, hyperactive animals and all other things distracting! Put on some appropriate croissant making music and lets get to it…
Please read the following tips;


According to Raymond Calvel croissants laminated with margarine are formed into the crescent shape, while croissants laminated with butter are left in the straight form. We say, use whichever shape you like best, but do use butter!
The croissant recipe

Ingredients for the croissant dough
500 g French Type 55 flour or unbleached all-purpose flour / plain flour (extra for dusting)
140 g water
140 g whole milk (you can take it straight from the fridge)
55 g sugar
40 g soft unsalted butter
11 g instant yeast
12 g salt
Other ingredients
makes 15
280 g cold unsalted butter for laminating
1 egg + 1 tsp water for the egg wash
Day 1
Making the croissant dough
We usually do this part in the evening. Combine the dough ingredients and knead for 3 minutes, at low to medium speed, until the dough comes together and you’ve reached the stage of low to moderate gluten development. You do not want too much gluten development because you will struggle with the dough fighting back during laminating. Shape the dough like a disc, not a ball, before you refrigerate it, so it will be easier to roll it into a square shape the following day. Place the disc on a plate, cover with clingfilm and leave in the fridge overnight.


Day 2
Laminating the dough
Cut the cold butter (directly from the fridge) lengthwise into 1,25 cm thick slabs. Arrange the pieces of butter on waxed paper to form a square of about 15 cm x 15 cm. Cover the butter with another layer of waxed paper and with a rolling pin pound butter until it’s about 19 cm x 19 cm. Trim / straighten the edges of the butter and put the trimmings on top of the square. Now pound lightly until you have a final square of 17 cm x 17 cm. Wrap in paper and refrigerate the butter slab until needed.


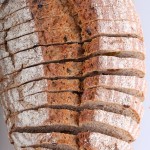
Take the dough out of the fridge. With a rolling pin roll out the dough disc into a 26 cm x 26 cm square. Try to get the square as perfect as possible and with an even thickness. Get the slab of butter from the fridge. Place the dough square so one of the sides of the square is facing you and place the butter slab on it with a 45 degree angle to the dough so a point of the butter square is facing you. Fold a flap of dough over the butter, so the point of the dough reaches the center of the butter. Do the same with the three other flaps. The edges of the dough flaps should slightly overlap to fully enclose the butter. With the palm of your hand lightly press the edges to seal the seams.

Now the dough with the sealed in butter needs to be rolled out. With a lightly floured rolling pin start rolling out, on a lightly flour dusted surface, the dough to a rectangle of 20 x 60 cm. Start rolling from the center of the dough towards the edges, and not from one side of the dough all the way to the other side. This technique helps you to keep the dough at an even thickness. You can also rotate your dough 180 degrees to keep it more even, because you tend to use more pressure when rolling away from you than towards yourself. You can use these techniques during all the rolling steps of this recipe. Aim at lengthening the dough instead of making it wider and try to keep all edges as straight as possible.
Fold the dough letter style, cover with clingfilm and refrigerate for 30 minutes (fold one third of the dough on top of itself and then fold the other side over it). Repeat the rolling and folding two more times (ending up with 27 layers of butter in total), each time rolling until the dough is about 20 cm x 60 cm. After each fold you should turn the dough 90 degrees before rolling again. The open ‘end’ of the dough should be towards you every time when rolling out the dough (you can see this in our croissant making video at around 3:40 minutes). After the second turn, again give it a 30 minute rest in the fridge. After the third turn you leave the dough in the fridge overnight until day 3, the actual croissant making day!
- Roll out to 20 cm x 60 cm
- Fold
- Refrigerate 30 minutes
- Rotate 90 degrees
- Roll out to 20 cm x 60 cm
- Fold
- Refrigerate 30 minutes
- Rotate 90 degrees
- Roll out to 20 cm x 60 cm
- Fold
- Refrigerate until day 3
- Rotate 90 degrees
- Roll out to 20 cm x 110 cm
Also see complete time table at bottom of page


Day 3
Dividing the dough
Take the dough from the fridge. Lightly flour your work surface. Now very gently roll the dough into a long and narrow strip of 20 cm x 110 cm. If the dough starts to resist too much or shrink back during this process you can fold it in thirds and give it a rest in the fridge for 10 to 20 minutes before continuing. Do not fight the dough, when the dough refuses to get any longer, rest it in the fridge! It is such a shame to ruin two days of work.
When your dough has reached its intended shape, carefully lift it a few centimeters to allow it to naturally shrink back from both sides. This way it will not shrink when you cut it. Your strip of dough should be long enough to allow you to trim the ends to make them straight and still be left with a length of about 100 cm.


Shaping the croissants
For the next stage you will need a tape measure and a pizza wheel. Lay a tape measure along the top of the dough. With the wheel you mark the top of the dough at 12,5 cm intervals along the length (7 marks total). Now lay the tape measure along the bottom of the dough and make a mark at 6,25 cm. Then continue to make marks at 12,5 cm intervals from this point (8 marks total). So the bottom and the top marks do not align with each other and form the basis for your triangles.
Now make diagonal cuts starting from the top corner cutting down to the first bottom mark. Make diagonal cuts along the entire length of the dough. Then change the angle and make cuts from the other top corner to the bottom mark to create triangles. Again repeat this along the length of the dough. This way you will end up with 15 triangles and a few end pieces of dough.

Using your pizza wheel, make 1.5 cm long notches in the center of the short side of each dough triangle.
Now very gently elongate each triangle to about 25 cm. This is often done by hand, but we have found that elongating with a rolling pin, very carefully, almost without putting pressure on the dough triangle, works better for us. You can try both methods and see what you think gives the best result.
After you cut a notch in the middle of the short end of the triangle, try and roll the two wings by moving your hands outwards from the center, creating the desired shape with a thinner, longer point. Also try and roll the dough very tightly at the beginning and put enough pressure on the dough to make the layers stick together (but not so much as to damage the layers of course).

Proofing and baking
Arrange the shaped croissants on baking sheets, making sure to keep enough space between them so they will not touch when proofing and baking. Combine the egg with a teaspoon of water and whisk until smooth. Give the croissants their first thin coating of egg wash. You do not need to cover the croissants with anything, the egg wash will prevent the dough from drying out.
Proof the croissants draft-free at an ideal temperature of 24ºC to 26.5ºC / 76ºF to 79ºF (above that temperature there is a big chance butter will leak out!). We use our small Rofco B20 stone oven as a croissant proofing cabinet by preheating it for a minute to 25ºC / 77ºF. It retains this temperature for a long time because of the oven stones and isolation. The proofing should take about 2 hours. You should be able to tell if they are ready by carefully shaking the baking sheet and see if the croissants slightly wiggle. You should also be able to see the layers of dough when looking at your croissants from the side.


Preheat the oven at 200ºC / 390ºF convection or 220ºC / 430ºF conventional oven.

Right before baking, give the croissants their second thin coat of egg wash. We bake the croissants in our big convection oven for 6 minutes at 195ºC / 385ºF, then lowering the temperature to 165ºC / 330ºF, and bake them for another 9 minutes. Hamelman suggest baking the croissants for 18 to 20 minutes at 200ºC / 390ºF , turning your oven down a notch if you think the browning goes too quickly. But you really have to learn from experience and by baking several batches what the ideal time and temperature is for your own oven. Take out of the oven, leave for a few minutes on the baking sheet, then transfer to a cooling rack.
Latest way of baking; We heat up our double fan big convection oven at 200ºC, when heated up put the croissants in the oven and directly lower it to 175ºC. We bake them for 10 minutes at 175ºC, they will have a nice brown color by now, then lower the temperature to 150ºC, and bake them for another 6 minutes.
Best eaten while warm and fresh of course. Croissant we don’t eat or share within a day we freeze. We put them in the preheated oven (180ºC / 355ºF) for 8 minutes straight from the freezer. Nothing wrong with that, croissants eaten nice and warm, almost as good as the fresh ones…almost!
Croissant Time Table
Times are an indication and also depend on your experience with the recipe
Try to work swift but precise and take extra fridge time if needed!
Day 1 – Make initial dough
- 21.00 h – Knead for 3 minutes and store in fridge for 12 hours
Day 2 – Laminate the dough
- 09.00 h – Make butter slab and refrigerate till needed
- 09.05 h – Roll dough disc into square
- 09.10 h – Seal butter in dough
- 09.15 h – Roll out to 20 cm x 60 cm and fold
- Refrigerate 30 minutes
- 09.50 h – Rotate 90 degrees
- Roll out to 20 cm x 60 cm and fold
- Refrigerate 30 minutes
- 10.25 h – Rotate 90 degrees
- Roll out to 20 cm x 60 cm and fold
- 11.00 h – Refrigerate until day 3
Day 3 – Dividing, Shaping, proofing and baking
- 09.00 h – Roll out to 20 cm x 110 cm – part 1
- 09.05 h – Often needed! Take 20 min. fridge time if length not in one go
- 09.25 h – Roll out to 20 cm x 110 cm – part 2
- 09.30 h – Divide and shape the croissants
- 09.40 h – First coat of egg wash
- 09.45 h – Proof to perfection (indication 2 hours)
- 11.45 h – Second coat of egg wash
- 11.50 h – Bake for 15-18 minutes
- 12.10 h – Ready!


Salome says
Hello!
Just a few questions –
I have never seen “instant” yeast in a supermarket in Australia. I was wondering what the alternative amount for dry yeast and how to use it would be?
Also – as it gets very hot here at the moment, for the proofing stage, could I just leave the croissants out on the bench? (Temps without aircon are around 28 degrees inside – obviously aircon will be on the the rest of the process!). The humidity levels are quite high so I’m worried this would affect it?
Thanks 🙂
Tammy says
Hi Salome,
I live in Melbourne. I just baked these goodies this morning, using dry yeast with same quantity.
As for the proofing part, I guess all about the timing for us here in Oz. I did mine early this morning whereby I checked our weather forecast to get the proofing done (in the oven with a digital thermometer to monitor the temp – ard 22.5 – 26 degs) latest by noon (after that, it went up to 30++).
Hope this helps in the meantime whilst waiting for the experts to reply 🙂
Tammy
Weekend Bakers says
Hello Salome and hello Tammy,
We think your dry yeast is indeed the same or very close to our instant dry yeast. And Tammy your results confirm this. Your other advice is also perfect, becuase you are the expert here. Use the weather knowledge to establish when would be the best time for prepping and proofing. If it gets too warm, use the fridge any time needed to cool the dough. For any first time croissant baker we advice to, if possible, choose a day that is as favorable as possible. When proofing it is very important the temperature will not get above the 26 C mentioned otherwise butter will leak out of the dough.
Very impressed with your baking and adapting to these challenging conditions!
Greetings,
Marieke & Ed
leonie says
but it has a little toooooooooooooooooooooooooooo much BUTTER in it so I sugesst half the amount
Weekend Bakers says
Our suggestion would be to keep the amount of butter but eat half a croissant!
leonie says
I would give this recipe a 4 star rating
leonie says
PERFECTION!!!!!! These croissants are amazing even though the first time I tried to make them it was a complete fail but then I tried again and it was brill
Weekend Bakers says
You are not alone of course, looking back our first attempts were miserable, so you did really good!
Danyelle says
Can you give the ingredients to this recipe in units of cups? Thank you.
Weekend Bakers says
Hello Danyelle,
We always stress we very much recommend using scales and weighing the ingredients for good results, especially with croissants.
Here you find the units as given in the Hamelman recipe:
For the dough
1 lb. 2 oz. (4 cups) flour;
5 oz. (1/2cup plus 2 Tbs.) water
5 oz. (1/2 cup plus 2 Tbs.) whole milk
2 oz. (1/4 cup plus 2 Tbs.) sugar
1-1/2 oz. (3 Tbs.) unsalted butter
1 Tbs. plus scant 1/2 tsp. instant yeast
2-1/4 tsp. table salt
For the butter layer
10 oz. (1-1/4 cups) cold unsalted butter
Happy baking
Vidia says
I understand I did this course onece I try it I haply get back recipe thank souch
Weekend Bakers says
Thank you Vidia!
Anna says
Hi, I found your site looking for a croissant recipe for high humidity place, where I live it’s difficult to keep the butter solid because of high temperatures. Would you please tell me if if I can really make them where I live or leave it for people who live in cold temp places? I would be grateful to hear from you.
BarbaraL says
Try using Presidente unsalted butter. I recently took a croissant class in Paris – the methods used are the same as this blog – the baker told us that Presidente is the only acceptable butter! I promise I don’t work for them. I’ve made croissants twice now using it and the butter is quite dry and hard so might work for you. I feel that my usual American butter wouldn’t have stayed solid.
Weekend Bakers says
Hi Anna,
Baking in Holland, we cannot aid you with our own experience, but we have received positive feedback from people baking in tropical climes and being successful. Of course it is a big challenge and you need to prepare well and use the fridge and freezer as much as possible and whenever needed and keep your ingredients, dough and even tools as cool as possible too.
Susie Tunks says
Good morning, Weekend Bakers Extraordinaire! (You guys rock!)
Sorry to bug you again but I have another question. I am using your croissant dough recipe to make pain au chocolat. I know you don’t have directions for that but I just cut them to the right rectangular size and then roll with chocolate. Easy-peasy! My question is: Why are the tops of my pain au chocolat cracking? Some of them come out smooth and even on the top, but most have cracks and “fissures” in them. I egg wash them as I do all my other croissants. What am I doing wrong? Thanks so much! <3
Susie Tunks says
Woohoo! Never mind! I figured it out! Just pulled a batch of pain au chocolat out of the oven and they are PERFECT! What was I doing wrong? Too MUCH egg wash! I guess I’ve been a little heavy-handed! The croissant don’t seem to mind that, but the pain au chocolat require a much lighter touch with the wash! Thanks for listening! LOL Love you guys!
Weekend Bakers says
Hi Susie,
Thank you for sharing too, this is also a great tip for other bakers of course.
Vivian joseph says
Can’t one put d dough in a freezer for 1 hour instead of 6hours
Weekend Bakers says
Hello Vivian,
With this three day recipe, everything is done for reasons of timing and the ultimate result.
Of course you can speed things up like you suggest. The one day version of our croissant recipe does exactly that: www.weekendbakery.com/posts…nt-recipe/
Happy croissant baking
Anonymous says
your recipe is mediocre, your instructions are not easy to follow and the butter keeps leaking out while rolling!!!! frustrating!!!
Anonymous says
I have use other recipes before and they work perfectly
Susie Tunks says
I disagree completely! I taught myself to make croissant with these excellent instructions, pictures, and Q and A’s! This is my go-to recipe, and I get all the flaky goodness and honeycombing of an excellent croissant! People absolutely rave about my croissants! Thank you Weekend Baker!!!!
Weekend Bakers says
Thank you for this big compliment Susie, much appreciated!
Johnny says
I have to agree with Susie. I found the instructions in this website to be one of the best, if not the best, in making croissants (especially for novices like me). I have tried 4 other resources and the croissants were not as successful. If you have found other great recipes/resources, perhaps you can share with us to add to our knowledge bank :-).
Weekend Bakers says
Thanks Johnny, very glad to hear this of course. Happy baking 🙂
Daksha says
i have been using this recipe for over a year now and the croissants are wonderful! The method and the science is really explained so well. Thank you!!
Weekend Bakers says
Thank you Daksha,
So glad you found it clear and have been a fan of the recipe for a while now.
Happy baking and maybe you want to try some other favorites with this dough too:
www.weekendbakery.com/posts…x-raisins/
www.weekendbakery.com/posts…y-caramel/
Fabio Gross says
Hello,
Nice recipe, thanks for all the details.
I am just strugling with one thing: english is not my main language so I didn’t understand what “proofing” is in this context, if you could clarify or explain this part of the process with another words I would appreciate.
Fabio Gross says
Nevermind, found it: (baking) proofing, the resting period of the dough to let the yeast work.
Will try your recipe this weekend.
Weekend Bakers says
Very good, yes! Let us know how you get on.
Happy croissant baking 🙂
Tammy says
Hi,
I stumbled upon your site after two failed attempts of making croissants over the weekend. I love your approach and structured way of explaining things step by step to us readers – its actually quite comforting to be honest.
The recipe that I used only require a day of making croissants and uses bread flour. My question would be do all purpose flour yield the same results as type 55 flour from your recipe? I live in Melbourne and it’s difficult to get bread flour here unless you work for commercial purposes.
Thanks and keep up the good work.
Cheers,
Tammy
Weekend Bakers says
Hi Tammy,
Thank you very much. Your question is somewhat hard to answer as your all purpose flour might be very close to type 55, but at the same time our experience with different flours and different brands of flour makes us hesitate to answer with a confident ‘yes’. We would suggest giving it a try with the best quality AP flour you can find that also has a protein content same as or very close to the 11% of the French type 55 flour.
Good luck with it and happy baking!
Susie Tunks says
I was having good results but wanted better. Weekend Baker suggested I switch flours. I did, and now I have an excellent croissant! Try using King Arthur’s AP flour (red bag)! Very consistent results and wonderful flake and crumb!
Tammy says
Dear Weekend Bakers,
Just baked some croissants using your wonderful recipe. These three days of preparing it were filled with excitement, worries and happiness (i was actually smiling as I rolled the dough, don’t worry i am not crazy) – it’s so therapeutic.
The results were good – quite flaky and buttery with a nice honeycomb-pattern inside.
I have a few questions though to improve my methods.
1. I followed your recipe to the T however during baking, the croissants did not puff up as much as I hope it will be. Could it be that I did not proof it to the max? I proofed them for a good 3 hours in draft-free oven until i quickly prepared for baking (as the temperature went up to 26degs inside the oven – thanks to Melbourne’s weather today it’s 36 degs here!). Could it be that it did not proof to the max? I did the jiggle test though and it wobbled nicely.
2. Also, I realized that the bottom tray did not flake much as the top tray – I have the same 2 fans convection oven as yours and using your latest oven temp as mentioned. What could be the culprit?
Nevertheless, many thanks for your step by step guide and video. I enjoyed myself tremendously when making this and will not stop myself until i get the perfect ones :).
Out of curiosity, would you happen to have some tips on how to make the bi-colored versions?
Thanks and with love from down under,
Tammy
Daphna says
Just made croissants following this recipe step by step. Came out delicious and professional.
The only change I made is that I did all steps on the same day, waiting 3 hours from making the dough to first opening (day 1 to day 2) and then 3 more hours before the final opening (day 3).
Weekend Bakers says
Thank you Daphna, we do not know if you also saw our 1 day version, but you already figured it out. Maybe our tips on freezing and retarding that come with this post will also be of use for future baking: www.weekendbakery.com/posts…nt-recipe/
Happy croissant baking!
vicki says
i researched alot of croissant recipes (online and my bread books) before i chose yours as my basis. ive never made them before but i have made alot of different breads. ive also researched american flours as opposed to european and have a basic understanding of the difference. i know you said not to make any adjustments the first time but i also knew even a good ap flour wasnt gna work (at least for me) so i ended up with 50% bread flour, 25% german 405 flour, and 25% unbleached ap flour. all else was as per your recipe and thank you so much for using grams instead of oz or cups… saved me time getting conversions!
i had a difficult time trying to roll the dough fresh out of the fridge so i let it set for 15 min before i started rolling and put it back in if the butter started getting too soft. a few times my outside dough layer got a little thin n butter was exposed. i patted a little flour on the bare spot then back in the fridge. btw… i used the 405 flour to dust with. i had some difficulty with enough room to get 110cm on the length since i roll back to front and the counter is only allowed for 80cm or so. instead, i folded up one half while rolling the other half. worked out well that way. i was pleased the dough stayed nice and soft without getting sticky. i really thought the butter was gna mix in w the dough n make everything gooey.
based on how my oven works, i used 400° for 10 min and 350° for 5 min. they came out beautifully brown, crispy, flakey, and buttery. the dough was a little soft in the middle at first but that was because i could help but eat one fresh out of the oven. once they cooled, all the dough was perfectly cooked. i was very impressed with the recipe and the end result. i was really happy they came out so scrumptious on the first try. nexr time i plan to add a couple of sweet layers. i cant wait.
thank you so much for posting!
vicki
Weekend Bakers says
And thank you Vicky for your addition. Your baking experience and knowledge have added much in making this recipe a success even with a first try. Excellent!
have you seen our one day version plus tips for retarding and freezing?
www.weekendbakery.com/posts…nt-recipe/
Happy laminating and baking!
Sarah G says
Hi there guys! Thank you for putting this tutorial together, I can’t wait to give it a try. I am wanting to use this recipe to replicate some glazed croissants I had recently in Barcelona, that were filled with mango! My question is this – should I fill the croissants before or after baking? I was thinking I would inject them after baking, ala Krafpen/Berlina/Jam Donut but a comment I read from another user said they stuffed theirs before baking? Would love your thoughts!
vicki says
i hope its ok that i comment since im not the person that posted this recipe but ive researched french croissants and the italian cousins. while they are similar, they arent the same thing. italian cornetti are typically sweeter and denser. i happen to like the croissant texture and flavor better and plan to use this recipe as opposed to the cornetti recipes ive seen.
as far as the filling goes, all the recipes ive seen with fruit and cream type fillings are injected after cooking/cooling using a pastry bag. this way the dough isnt affected by the liquids.
Weekend Bakers says
Thank you Vicky, we would agree. We have never filled croissants with mango but we assume it is in the form of jam / confiture Sarah, so for the sake of the pastry the injection method would be our choice too.
Hope it will be delicious
Rita Belserene says
My first attempt was wildly successful! Thanks so much for the excellent directions. Having watched the video, I had the sense that I had done this before. My husband said he prefers the results to those available from our two excellent bakeries. High praise.
I combined days 1 and 2 by making the dough in the morning and doing the folding and rolling the same evening. At 6 the next morning I formed my crescents and let them rise. This worked fine for me. I had no troubles rolling out any of the stages and we were enjoying the results by 9 AM.
I heated my conventional oven (which loses heat way too easily) to 450 F, and turned it down to 375 F when I put the croissants in. I ended up cooking them for almost 20 minutes at that temp to get proper browning. I cooked in two batches with the pan high in the oven. As you say, you need to know your oven.
Rita
Bainbridge Island, WA
Weekend Bakers says
Hi Rita,
Very impressive, to make such a challenging recipe the first time and already knowing how to make it your own, adapt, think on your feet and get such good results (and high praise).
Maybe our one day version will be something you would like to give a try too:
www.weekendbakery.com/posts…nt-recipe/
Happy laminating and baking!
ChristIna Honner says
Thank you for an amazing recipe it really works for me first time. Couldn’t roll the dough out to 120×20 but to 90×20 got 16 nice size croissants.Baked them of at 175 for 10 min. Then 150 for 6 min. They are delicious.
Weekend Bakers says
Thank you ChristIna, that sounds excellent, after this great result you will hopefully be enthusiastic to bake some more. With some more practice and experience you can maybe also give our one day version a try and compare the two: www.weekendbakery.com/posts…nt-recipe/
Happy baking, sharing and eating!
vinayak says
I want to ask you about flakyness , how we can keep the flakyness in croissant longer time after baking
Weekend Bakers says
Hello Vinayak,
We would advice to put the croissants you do not eat the day of baking in the freezer, right after they have cooled. For extra flakiness and ‘almost as good as freshly baked’ you can put them into an oven for about 8 minutes at 175 Celsius, straight from the freezer.
For more tips on freezing unbaked croissants, see the one day version of our recipe here:
www.weekendbakery.com/posts…nt-recipe/
Hersh says
Thanks guys for the amazing recipe. Till now had to go to real good places for good crossaints but I’m sure that’ll be a thing in the past now. Baked initial lot and they’ve come out really nice. Many thanks for the great recipe. The video depiction is really good and helped a lot.
Keep up the great work and your help to the humanity!! I’ll be back for more for sure.
Thanks.
Hersh
Weekend Bakers says
Hi Hersh,
Thank you so much for your very kind feedback. If you feel confident you can try our one day croissant version too: www.weekendbakery.com/posts…nt-recipe/
Happy baking and sharing
Samer says
Hello
Thanks shaing the recipe, but unfortunately when i tried the dough was too moist and sticky to handle knowing i used only the 140g water and 140g milk as per the recipe while i can see in your pics the dough looks perfect on other hand the dough got proofed over night in the refrigerator and the plastic wrap got stuck all over the dough.
Thanks in advance for your help
BR/Samer
Nads says
Same here!!! It was so puffed up and the texture was different from yours, more like a bread dough than anything. It was difficult to roll in the butter and ended getting butter busting at the seams 🙁
Nads says
help!! It puffed up while leaving it in the fridge overnight and the texture wasn’t pie like dough anymore, more like bread dough which makes it difficult to laminate the butter :((( and it goes downhill from there, butter is bursting at the seams. Please advice
Weekend Bakers says
Hello,
First of all it seems your flour absorbs less moisture than the type 55 flour we are using. Maybe this was the first time you attempted this recipe. Experience with your flour, yeast, fridge temp and oven will learn what adjustments you must make. If you try and use less moisture (or maybe a different flour) next time, it will also get less sticky. Make sure to use clingfilm that is coated with flour to avoid the sticking. The activity of your yeast, in combination with your fridge temp and the time of the dough in the fridge may need some tweaking to avoid it puffing up too much, but keep in mind it does puff up (see fourth picture in day 1 gallery) somewhat and does look more like bread dough before laminating. You have to carefully deflate it when you start rolling on day 2.
Our video might be of help too, in judging how things should look.
Good luck with it!
vicki says
what i did…
first, its dry in my house this time if year due to cold outside temps and the heater running. i keep my house at 66°/67°.
from research, i know americn flour is different than european. i mixed half/half white lilly bread flour and cake flour… no AP flour.
instead of leaving the dough on a plate, i dusted with cake flour then wrapped it completely in plastic wrap… not super tight, but no room to let air in. the dough was flat when i put it in. the plastic wrap kept it from expanding too much. i have also seen ppl putting a bag of sugar on top to keep it from expanding too much.
i let my dough sit out for 15 min before rolling so it didnt crack and ooze butter. by the same token, if the butter got too soft, i put it back in the fridge for a bit.
my dough stayed perfectly pliable but dry to the touch. it was alittle tacky but wasnt sticky coming out of the mixer.
hope this helps.
Weekend Bakers says
Thank you Vicki for adding these great tips based on your experience!
Sarah Lowry says
I found this recipe shortly before going on maternity leave and decided that I would try it at some point during my leave. I read the recipe and instructions and watched the video several times. I was fully prepared to fail miserably on the first try. I did the Day 1 stuff early in the day and Day 2 stuff later that night. The active time was less than I anticipated. I purchased a marble rolling pin and kept it in the freezer during the process which I think helped me relax and not worry as much about how long it took during the laminating process. I wish I could upload pictures to show you, they came out amazingly! Your instructions were on point. I have flaky brown, beautiful and delicious croissants in my kitchen right now, thank you!
Weekend Bakers says
Hello Sarah,
Thank you for such lovely feedback. Great to hear the marble rolling pin was something you are positive about, we do not have experience with it ourselves.
We do have a section of our website dedicated to bakes by other bakers:
www.weekendbakery.com/send-…your-loaf/
If you still feel like it and have the time, maybe you can send them and we will show them on our site.
Happy croissant baking!
Ed & Marieke
Sherry says
Thank you so much for your wonderful and detailed recipe. I made this today and it turned out good for a first timer. I followed your recipe step by step. My only issue is that it didn’t turn out very fluffy. The center was a bit heavy. Im not sure if the proofing time (2hrs) was not enough or if there was a problem some were els. BTW, I used active dry yeast which i activated in water according to the instruction instead of instant yeast. I subtracted the water amount that I used to activate the yeast from the water amount that your recipe called for so i wouldn’t have extra water in my dough. So could this be the reason. They looked and tasted great, but a little hard and not as airy and fluffy that I would like.
Thank you!
Weekend Bakers says
Hello Sherry,
Without seeing your result we would guess the proofing might have been a bit short. Using the active dry yeast (the correct way like you did) should make no difference.
It is important to get the temperature of the dough right when proofing and to wait as long as need be, to get the wobble and the perfect proofing before taking it to the oven.
You are already pleased with your first result and with each new round of baking you will make it more your own and get even better results we are sure!
Happy croissant baking in the New Year!
Martin says
Sorry about this but you mention you get 27 layers from three turns. I’m afraid it’s actually 81 layers since you already have three layers (dough-butter-dough) before the tourage begins. 3x3x3x3=81.
Wonderful explanation of how to make croissants otherwise. One of the very best.
Weekend Bakers says
Hello Martin,
Thank you very much. You actually count the layers of butter. So the layer you want to see as three layers, only counts as one layer. The butter in between the two layers of dough is what makes the croissant puff up and flaky. And when you fold three layers (dough/butter/dough) you do not get six layers but 5 (consisting of dough/butter/dough/butter/dough).
Hope this makes sense. The important thing is to do the three turns, which will give you 27 butter layers (we will clarify this in the recipe also).
Thank you again and happy croissant baking in 2017!
suzie says
Finally i took the courage to try the croissant recipe out in this cold xmas holiday and i cannot be so excited and delighted to tell you that i have succeed! It may not be the perfect croissant yet but on my first attempt, the outcome structure and layers are pretty decent. I did find my 2nd tray look better with the higher oven, agreed with you on knowing your oven is important. I will try again when I have more time on hang, really appreciate the detailed tutorial. I kept it to point step by step. really useful!!!
thanks a million!
Weekend Bakers says
Hello Suzie,
Thank you for your wonderful feedback. Sounds like you did great and will only improve as you gain more experience with the recipe and method. Maybe after a while you can move on to our one day version an d can play around with retarding and freezing and plan the baking around a busy schedule.
See: www.weekendbakery.com/posts…nt-recipe/
Happy croissant baking and happy New Year!
Hilary Webb says
I made your original croissants yesterday. What a beautiful recipe. They came out perfectly. After I pulled them out of the oven I went back into my kitchen 4 times just to look at the incredible croissants, I was so happy.
15+ years ago I did a stage at Laduree in Paris under Pierre Herme. The viennoiserie recipes I have from there are difficult and intended to be made by a team of 8. We had a large laminating machine and the room was also very, very cold as I remember. We used a spray gun to lacquer the pastries with egg wash before baking. The egg wash was passed through a fine sieve before loading the sprayer.
Yesterday, I used the croissant scraps to make kouign aman, but I carefully stacked the scraps one on top of the other before rolling into squares and they came out very nicely stratified (and delicious, dank je wel). As I remember we used salted butter at Laduree for kouign aman. It was the only pastry we used salted butter for. I had never seen kouign aman before. I think were were one of the few patisserie at that time making them outside of Brittany.
I filled some of the croissants with apricot jam and topped them with a crunchy sugar crust, like I remember the cornetti from Antonini Pasticceria in Roma. When I rolled up the jam-filled croissants, I pressed on the “wings” more firmly than with plain croissants in order to securely enclose the jam. I brushed a sugar glaze on the tops after they came out of the oven. 30g milk cooked briefly with 110g confectioners sugar until amalgamated and a few drops of almond extract.
At Laderee, day-old croissants were made into almond croissants, sliced in 1/2, each 1/2 dipped in a rum-infused syrup (125ml water, 32g sugar, 1tsp rum), filled with creme d’amande (60g soft butter, 50g sugar, 1t of each almond and vanilla extracts, 60g finely ground almonds, 1 egg), topped with sliced almonds and baked 15min at 210C. Dusted with confectioners sugar once cooled. Delicious. I won’t have enough from this batch to have any day-olds.
I have 2 questions:
Q1: Instant yeast – In the US we have 2 kinds of dried yeast, “Active Dry” and “Quick-Rise Instant Yeast”. I believe the 2nd is used mostly for bread machines where the yeast is not proofed in water before adding to the mix. Is this the yeast you have used as “Instant Yeast” in your recipes?
Q2: Have you ever tried freezing the croissant dough after all the laminating is finished but before you roll and shape them? Or freezing shaped but unrisen croissants? It was not clear to me if when you froze your croissants if they were cooked or uncooked.
You have roused great memories I have of eating fabulous food in The Netherlands, which makes a lot of Dutch people laugh until I clarify – I had the joy of staying (& eating) at Cas Spijkers’ de Swaen in Oisterwijk (yum yum) and Maartje Boudeling’s Inter Scaldes in Zeeland. But the tomato soup with tiny, tiny meatballs and fresh chives that I ate at a cafe along the highway was just as spectacular as was every slice of brown bread that I ate while there.
You have both taken a considerable amount of time and effort to share your wonderful recipes (that work!) with others. Hartelijk bedankt from San Antonio TX (where the biscuits are delicious but made with Crisco instead of butter and both corn masa and flour tortillas are sold hot and fresh at the supermarket.)
Weekend Bakers says
Hello Hilary,
Thank you for sharing your experience and enthusiasm and all the very interesting and above all very tasty tips for us to enjoy and play around with in the near future. Much appreciated!
To answer your questions:
1. We think, based on what you write, your Quick-Rise Instant Yeast is almost certain the same as our instant yeast (it is usually also added to the other ingredients in a dry form, without needing any prior activation).
2. We have to say we never freeze the laminated dough before the shaping, but we know it is possible. We have experimented with retarding and freezing croissant dough and a description can be found with our ‘one day croissant recipe here: www.weekendbakery.com/posts…nt-recipe/
WE think you might want to give this quicker version of our recipe a try too maybe.
And yes, in general we are not so proud of our Dutch food heritage. But you have been to a few famous places and Inter Scaldes was even crowned best restaurant of Holland this year. Our food culture is developing in interesting ways though, and there are people over here that are truly doing amazing stuff, lots of tiny projects, even at people’s homes. The best and most interesting food can be found at food festivals, food trucks, home restaurants and special markets. We love meeting like minded people who experiment and want to try and make the best bread, beer, burgers, chocolate, cheese et cetera.
Enjoy the baking and eating in TX also in the New Year!
Greetings from the low countries,
Ed & Marieke
Margaret says
I made this trceipt and it was my first attempt at making them they were amazing. The trick is patience. Take your time spread out over three days.
Weekend Bakers says
Thank you Margaret, very good and very wise words too. If and when you think you have gained enough experience and you are still very happy with the results, you could try our one day version too: www.weekendbakery.com/posts…nt-recipe/
And we can also recommend another favorite of ours using this same dough:
www.weekendbakery.com/posts…x-raisins/
Happy baking and happy holidays!
Susie Tunks says
Thank you so much for such a fantastic recipe – such clear directions and helpful tips on technique! I made them the first time about 3 weeks ago and have made these a dozen times since and it’s always gotten me wonderful results! People are falling over for my croissants and pain aux raisin!
One question: I live at high altitude (10,000 feet) in Colorado; my croissant come out flakey, buttery, and the center has good honeycombing (even with just plain old Land O Lakes butter!). However, they are not as lofty and high as I would like. Actually, some do come out lofty, but not consistently. Is this because of altitude somehow? They proof for about 2 hours and have good height when finished proofing, but then don’t retain their height in the oven. Perhaps I should use less yeast? I have tried using Kerry Gold butter but that didn’t change anything. I am using organic winter wheat unbleached all purpose flour. Scratching my head! Thanks for any help! (Oh, and I have made your pinwheels too! Fantastic! Thank you again! LOVE you site!)
Weekend Bakers says
Hi Susie,
That sounds more than excellent. Wonderful your baking enthusiasm and already lots of croissants ‘under your belt’ giving you lots of experience.
It is very hard to pinpoint what you could do to improve. We are not the most obvious people to give advice on baking at high altitude (based on experience that is) because we have always lived at minus 3 or something similar. We do not think the altitude is the reason for your croissants not retaining height. A first suggestion would be to experiment with other flour. Results can vary enormously, even with a new batch or sack of flour, we see differences between batches too. And maybe your oven temperature and moment of tempering could make some difference.
Hope this helps a bit, but we are sure your croissants are already awesome and taste fantastic.
Good luck with it and a very happy Holiday (baking) season!
Greetings from the low countries,
Ed & Marieke
Susie Tunks says
Hi, guys! Just wanted to thank you for these suggestions! I did as you suggested – changed the flour and now have excellent results with King Arthur’s AP! Finally I have the loft I was looking for, plus the honeycombing and flakiness that makes an excellent croissant! Thank you SO much for your dedication to this site and helping all of us with our troubleshooting! You guys ROCK!
Weekend Bakers says
Hi Susie,
We are hubled by your praise and very glad we could help and play a part in your great results.
Keep up the happy baking!
ayoub says
Very nice
Astrid says
Hi weekend bakery. Finally, I have found the perfect recipe for croissant in grams!! Thank you, I will definitely try to make this😃:). But I just have one problem (I guess?!). I’m using electric oven and it can only reach 190 degrees for its top temperature. On your recipe it needs to be baked in 195C and preheat the oven in 200 or 220C. Is it possible to reduce the heat to 190 or 180 and bake them in a longer time?! And will the croissant come out in the same results as the one that is baked in a shorter time with a hotter oven temperature?! Thank you in advance 🙂
Weekend Bakers says
Hi Astrid,
Bit hard to answer, because every oven is so different and reacts different. See our tips on the subject: www.weekendbakery.com/posts…your-oven/
We would advice to preheat your oven really well and make sure the temperature cannot drop too low, so open and close the door fast. Start at 190 and only lower the temp when the color is to your liking. You just need to do a bit of trial and testing to get to the right formula for your oven. So maybe a later tempering and a few minutes extra baking time, just give it a try.
Good luck and happy croissant baking!
Chef Ajay singh ritz carlton hotel riyadh says
Dear sir can u let mi knows how to make flaky danish pastry .pls asist mi.can we used same crossiant dough.or other recipe be used.pls we waiting for ur replay.
Weekend Bakers says
We also use the same laminated dough to make other Danish type pastries. See our recipes for this here:
www.weekendbakery.com/posts…x-raisins/
and
www.weekendbakery.com/posts…y-caramel/
Of course you can make many more variations.
Good luck with it.
Nora says
We baked this today, awesome results due to good, clear instructions. Thank you!
Weekend Bakers says
Excellent! Thank you so much for letting us know 🙂
Shirley Ho says
If I halve the recipe, the dough should be 18.4 x 18.4 and the butter about 12 x 12. Same for the laminated dough, you should only make one side shorter, so end up with a 20 x 30 rectangle. Then what about the size of the final dough right before cutting out the triangles? Originally it’s 20 x 110, so for the half recipe is 20 x 55?
Weekend Bakers says
Yes Shirley, that is correct, you have to still aim for a width of 20 to get a nice plumb croissant and with the 55 cm length you of course get half the amount of croissants of the original recipe.
Good luck with it!
Amina says
This is wonderful.i will start making it 1 week before eating because of the long procedure.
Weekend Bakers says
Hi Amina,
Like we said to Franca in the previous comment:
If this recipe goes well and you are familiar with the process and have good results, you can also check out our one day version of this recipe:
www.weekendbakery.com/posts…nt-recipe/
Happy croissant baking!
franca says
thanks 4 the tutorial hoping to try it soon
Weekend Bakers says
Hi Franca,
If this recipe goes well and you are familiar with the process and have good results, you can also check out our one day version of this recipe:
www.weekendbakery.com/posts…nt-recipe/
Happy croissant baking!
Sean L says
Hi WB,
Excellent post. Tried this week and came out O.K. Here are the issues I had. Your feedback is much appreciated.
1) After Lamination with butter and putting in fridge, the dough became dry to roll out
2) After the first turn (with butter inside), I can see butter like chunks of floating arctic ice within the dough (just the visual aspect). No leaking ever through the entire process. Note: In Anna Olson video on croissants (youtube), she talks about positively about shattering butter as she rolls out. Not sure if this is a good or bad sign
I used the the same measurements as you stated except:
40% Hydration (It was miss on my part which I will fix the next time)
10gm of sugar as opposed to 40 – 50. Not sure this inhibited yeast activity during day 2
250gm of Kerrygold butter
Sean L says
Hi WB,
A small (maybe colossal) correction to my post above. Just realized I used salted Kerrygold butter instead of unsalted. How would the extra salt impact the overall process?
Weekend Bakers says
Hello Sean,
Thank you for your comment. For your first question, please make sure your dough is very carefully wrapped so it cannot dry out. Make sure the dough is the right consistency and temperature to roll out. Adjust by using just a bit more water if needed (this you can judge as you gain more experience). The issues you describe are very common and have to do in part with the butter used. Like we say in the introduction: We use an organic butter with a low water content. A higher water content tends to make butter hard, which promotes tearing and breaking and ruins the layers. The butter we use has written on the package ‘at least 82%’ butterfat’. So hopefully you can find this.
If you use salted butter, you would most likely want to compensate by adding less salt to the dough (and yes, more salt inhibits more, but it will not make the big difference between failure and success)) (and we would compensate, but some people like things salty).
Good luck with it and happy croissant baking!