

After all those years, who would have thought, but I ♥ you whole wheat!
Klik hier voor Nederlandse versie
Do you need a bit of encouragement to start making a super healthy whole wheat loaf? Awful childhood memories like me of stale and even rancid bread? Get out and buy the best fresh! organic whole wheat you can find and give this loaf a chance! It is nothing like your memories, it is about 1000 times better, or frankly incomparable, with an intense flavor that is the opposite of bland. Close your eyes and you can see the wheat fields gently swaying in the wind.
This recipe is not highly original of course, there are many whole wheat levain recipes and they are all more or less the same. But it is a great loaf to have in your bread repertoire. This is our version of it and the recipe contains the exact details on how we create our loaf. People have told us (and we believe them) that they really work for them so here it is.
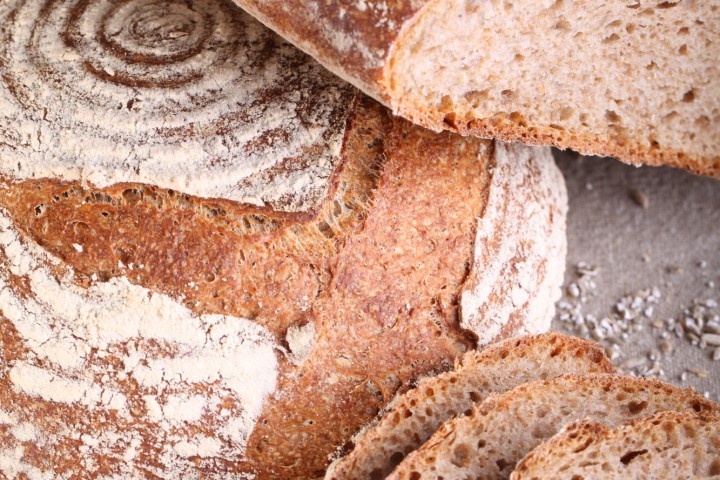
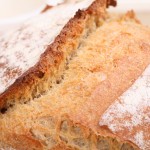
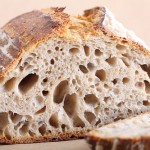
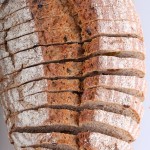
We started out by making a 55% whole wheat loaf. Gradually we started making more of this 65% loaf, the one described in this recipe, and people just love it. You can compare the two versions by looking at the first (65%) and second (55%) gallery of pictures below. The thing we love most about the recipe is you end up with a bread still very much crusty and creamy crumb, with a complex, sweet taste, while having this high percentage of whole wheat goodness in it.


For this recipe we are going to make a starter named a poolish. A poolish is a type of wet sponge usually made with an equal weight of water and flour and a small amount of sourdough starter culture or yeast and NO salt. Making a poolish helps bring more taste and strength to your bread.
We use a sourdough culture which is made with 100% whole grain rye flour. A sourdough culture based on rye flour is easier to maintain, does not go into a slurry when you forget about it, is easier to stir because it has almost no gluten and smells very nice, a bit like fruit. It is also very forgiving in the amount you feed it, everything seems to be alright. Normally we only feed it once a week, after our weekend baking we give it a few table spoons of water and rye flour, stir, ready!
Making the poolish
In a bowl stir together the 65 g whole wheat flour, 65 grams of water at room temperature with 15 grams of sourdough culture. Mix it well until you have a homogeneous slurry that looks like very thick batter. Cover the bowl with clingfilm and let the prefermenting begin. After 12 hours at room temperature it should be bubbly, light and ready for use. So if you want to begin your bread making in the morning, you should make your poolish at 9 in the evening.


| Ingredients for the poolish | ||||
|---|---|---|---|---|
| 65 | g | whole wheat (bread) flour | ||
| 65 | g | water (room temperature) | ||
| 15 | g | sourdough culture | ||
| Ingredients for the whole wheat loaf | ||||
|---|---|---|---|---|
| makes 1 loaf | ||||
| the poolish from step 1 | ||||
| 225 | g | whole wheat (bread) flour | ||
| 160 | g | wheat (bread) flour | ||
| 250 | g | water | ||
| 7 | g | (sea) salt | ||
Making the loaf
Put the poolish starter, flour and salt in the mixing bowl of your standing mixer and add 2/3 of the water. Now start mixing and gradually add the rest of the water and let the dough come together. We use European flour which absorbs a few % less water than American type flour. People using American type of flour should add 5-15 ml water to the final dough. Knead for 6 minutes, leave it in your mixing bowl, cover with clingfilm and rest for 50 minutes. The dough should feel a bit wet and even a little bit sloppy or tacky, there should be moderate gluten development.

Ideally the temperature of your dough after mixing should be around 24-25 ºC / 75ºF. You should adjust the temperature of the water you add, so the total dough reaches this temperature. For us this means in summer adding cold water to this recipe and in winter (when our little bakery gets much colder then the rest of our house) adding water up to 50ºC /122 F. You can measure the temperature of water and dough with a food thermometer. These measurements are important because they correspond with the proving times in the recipe.
After the first rest take the dough out of the bowl and onto a floured work surface and do one stretch and fold (a full letter fold, left over right, right over left, bottom over top, top over bottom; watch our bread movie to observe this technique if you are not familiar with it). Transfer to the bowl, cover and again leave to rest for 50 minutes. Repeat the stretch and fold (full letter fold) one more time (so 2 times in total) and again leave to rest for 50 minutes. During each stretch and fold the dough should feel firmer and less wet.

Now it’s time to shape. Shaping is a tricky subject. It’s something for which everybody develops his or her own technique over time. You can make a batard or loaf shape or a boule (ball). If necessary you can learn more on shaping from a good bread book, like the ones by Hamelman or Reinhart, or the Tartine Bread book. You can also check out our video on how to shape a boule.
Preheat your oven to 230 ºC / 445 ºF (at what stage you preheat your oven depends on how long it takes for your oven to heat through, some take 30 minutes, some, like ours, with stone floors take a lot longer, up to two hours.
Transfer the shaped dough in a proofing basket or baking pan, cover and leave to proof for 2 hours and 15 minutes (provided your dough has a temperature of around 24-25 ºC / 75ºF). When you think it has risen enough, use your finger to carefully make a very small dent in the dough. If the dent remains, the bread is ready to bake, if the indentation totally disappears, the dough needs a little bit more time.
Now your loaf is ready for the oven. Slash the top of the loaf with a lame or bread scoring knife. To get a nice crust, try to create some steam in your oven by putting a small metal baking tray on your oven floor when you preheat the oven, and pour in half a cup of hot water immediately after putting the bread in the oven. Release some steam by setting your oven door ajar (perhaps with the help of a wooden spoon or oven mitt) 5 minutes before the bread is ready. If you are going to create steam with a baking tray, you maybe also want to turn your oven temperature a bit higher, because you are going to lose some heat in the process.
After 48 minutes of baking your loaf should be ready. Transfer onto a rack and leave to cool. This loaf also keeps very well in the freezer. But please make sure to eat at least some of it while fresh!

Whole wheat levain time table
day 1 21.00 h Make poolish and let ferment for 12 hours at room temperature
day 2 0.900 h Make final dough
- Starter + all other ingredients 6 minute mixing
- 50 minutes rest
- Stretch and fold nr. 1
- 50 minutes rest
- Stretch and fold nr. 2
- 50 minutes rest
- Shape
- final proofing 2 hours and 15 minutes
- bake for 48 minutes at 230ºC / 445ºF
PS: A lot of people still believe the a whole wheat loaf should be very dark in color. The darker the bread, the healthier. This is a big misconception. These factory breads are filled with burned malt to give them that ‘healthy’ dark appearance. Don’t let them fool you…Just buy the best fresh flour you can find, take your time to make a good loaf and you’ll never look back!
PPS:Like with all the recipes you find on our website, this one was tried and tested by us at least 8 to 10 times before we published it.


Raz says
First of all thank you for a great website. Everything I’ve made worked very well.
I’ve been making this bread for a while now with good success. Lately I’ve started doubling the quantities but I’m not quite sure what to do about the mixing time. Any advice. Thanks. Raz
Weekend Bakers says
Hi Raz,
That sounds excellent! When doubling amounts, mixing times stay the same, so no need to change anything there (just always make sure your kneader / mixer is up to the job when increasing quantities).
Happy sourdough baking,
Ed & Marieke
Josh says
Hi-
I adjusted my room temp to 24 degrees, but I noticed the water temp did not change (as it does automatically with your other recipes). Can you confirm please that the calculator code is working for this page? (or perhaps it’s factoring in other things…)
Your website is hugely informational, and I LOVE the WKB calculator. (i’m looking for an American version inspired by yours! i.e., F temp and American flour hydration %’s). Have not tried your recipes yet, but am very much looking fwd to it. Thank you!
cheers,
Josh
Weekend Bakers says
Hi Josh,
Thank you for your kind comment. We looked into it but at the moment the dough calculator only calculates the temperature of the dough by means of the temperature of the room and the water. At this point it does not calculate the temperature of the water. We will look into it and perhaps a future version will get this feature. For now the calculator you see is the same for all the recipes. So it should not be possible that they behave differently (as far as we can see).
Thank you so much for liking and using the calculator and commenting on it. And also for your suggestions, we might be able to at least incorporate the F temp.
Hope you will give our recipes a try and let us know what you think.
Happy baking weekend!
Ed & Marieke
Rebecca says
I’ve been poking around on your site for a while now, and finally made this bread after a series of – well, not failed, but – less-than-successful baking projects. I’m not sure if it’s because I switched my starter over to rye (inspired by your information on starters), on which it is now thriving, or that I finally mastered the stretch-and-fold technique (thanks to your video), but this bread was the best I’ve baked in recent memory. Despite the compactness after the second proving, it had a great oven spring, a lovely open crumb and a gorgeous, delicious crust. Might even be, in all its simplicity, my favorite bread ever. (Though my partner thought it would be even better with walnuts.)
Thanks for your wonderful website, and this fantastic loaf!
Ps. If I were to add said walnuts, would I need to compensate with a bit of water?
Pps. I buy my flour at the mill in Wageningen (de Vlijt), I asked the last time I was there and they said the white bread flour (tarwebloem) contained about 11% protein. I have some gluten powder kicking around, would it make sense to add about a gram per 100 g flour to boost the gluten content, or should I leave well enough alone now that I’ve finally had a success?
Weekend Bakers says
Hi Rebecca,
Thank you for your enthusiastic comment. Great it all turned out so well. By the ‘sound of it’ you could maybe take the proofing just a little bit further. You can add the walnuts without changing anything else in the recipe (unless you are planning on using a very large amount).
With 11% protein, which is on the low side, you can add 2% of the flour amount to the recipe (around 10 grams per loaf is OK) and this should give you some more leeway for the proofing.
Just keep baking, making notes, keeping track of what works well and what not and your loaves shall be great!
Enjoy the baking,
Marieke & Ed
Rebecca says
A very belated thanks for your response. I made this bread several times as written and it’s definitely my favorite (I’ve also shared it with several friends). I did try adding the walnuts (about 75 g, lightly toasted) and the taste was great! (There were some rising issues, but also some temperature and timing issues and some lack-of-taking-notes issues, so I can’t say exactly what went wrong. I’ll try again soon,* holding other variables constant, keep better track, and report back my findings.)
Thanks again!
Rebecca
*Came back from a long vacation to a moldy starter, so had to start up a new one. I think it should be ready tomorrow, so now I just have to wait for the weekend….
Weekend Bakers says
You did good to start again Rebecca!
Rebecca says
Ps. Forgot to mention the gluten. I’ve been subbing 7 g of the white flour for gluten and that’s been working really well. I still don’t get a lot of rise in the 2nd proofing (which I forgot to mention I do overnight in the fridge, then 1-1.5 hour at room temp in the morning), but the oven spring is just lovely.
Pps. There are only two of us here, and it’s all we can do not to eat the whole loaf in one sitting. My partner just finished a slice and pronounced it “schandalig lekker!” 😉 Best. Bread. EVER.
Weekend Bakers says
Schandalig lekker is one of the highest scales of ‘lekker’ achievable 😉
Thanks again and lots of loaves!
Ömer Seyfi Salur says
almost 4 days I am baking this whole wheat bread it is coming off the oven splendid soon I willsend the pictures.
Weekend Bakers says
We would love to see some pictures Mr Salur.
Great to read your comment and knowing you are still very much enjoying the baking!
Greetings from Holland,
Marieke & Ed
Benjamin says
When do you add the salt?
Weekend Bakers says
See the first line under the header ‘Making the loaf’. Poolish, salt and flour go in together to make the final dough.
benjamin says
oh sorry my bad!
Do you cover the starter for the 12 hours?
Weekend Bakers says
Yes you do, it is always a good idea to cover starters and dough, first to avoid drying out but also to prevent things getting into it that you do not want ending up in your bread. (Cover with clingfilm it says in the recipe 😉
CliveK says
Fantastic recipe, simply explained and gives great results every time. Thanks guys, you are geniuses!
Weekend Bakers says
Thank you so much Clive, we are glad you like it and have good results.
Lots of loaves,
Ed & Marieke
Yves says
Hi
Wonderfull site..
Is it possible to make a poolish with a ratio of 50 per cent of the whole recipe using sourdough starter, just like we do with instant yeast. And if so what part sourdough is necessary ?
Weekend Bakers says
Hi Yves,
The consensus is that it stops at around 50%, so you can do that. It is not a rule but more of a guideline. After all you could say what is the dough and what is the poolish if you go over.
We do have some more tips for you here: www.weekendbakery.com/posts…lish-biga/
You can transfer the right amount of flour and water so you have equal parts for poolish and final dough. But note that you do NOT need to increase the amount of sourdough because the total dough quantity per loaf and the times do not change!
Yves says
Thanks again for all the works you’ve been doing for this site. And thank you for answering my question.
So if I understand right,,, for a 500 gram total flour, I could use 20 grams starter for a poolish at 50%, or a poolish at 30%. The only difference would be the fermentation time for the same room temperature….
Weekend Bakers says
Hi Yves,
No not exactly. You can take the same amount of time. The yeast needs a certain time to multiply. So whether you take 30, 40 or 50% poolish it will not really make a difference for their development. The poolish amount can not be too small of course because you need a minimal amount for them to do their work, but for this example you should just take the same amount of time with the same amount of sourdough culture for your 30 or 50% poolish version. Like we said the objective is to make a loaf of a certain weight and that stays the same too. The reason people would vary the amount of poolish also has to do with the structure of the crumb you get, complexity of taste etc.
Irene says
Hello! I am wondering why almost all whole wheat breads I come across only have 50% or less of whole wheat? Why not make it full whole wheat? I am baking with white bread flour but I am curious to try a more healthy version.
Weekend Bakers says
Hello Irene,
It depends on what your aim is and what type of bread you like. There are so many ‘schools’ of what is healthy and perfect et cetera. The reason a lot of recipes use a mix of whole wheat and bread flour for example is the structure of the bread. 100% whole wheat gives you a very compact and heavy loaf. Some people like this, lots of people do not. So the combination 50/50 gives a ‘healthier’ loaf with a structure still agreeable to lots of people.
No reason why you should not try and bake a 100% whole wheat loaf and see how it goes and how you like it. Just keep in mind the above and the fact that whole wheat soaks up more liquid than white bread flour.
Happy and healthy baking!
Irene says
Thank you so much for the great explanation!
Weekend Bakers says
Thank you for finding it useful!
Oguz Yilmaz says
Hi,
It is a wonderful recipe. Thank you.
I have two questions: Is it possible to reduce the proofing time to
60 minutes (from 2h 10m) if some dry yeast (7 g) is added at the final
stage (this was the case for “70 percent rye bread”)? If the whole
wheat flour percentage is increased, should the amount of water
be increased accordingly?
Thank you,
Oguz.
Weekend Bakers says
Hi Oguz,
Yes, that is very well possible. 7 grams would be a good indication. If you increase the wholewheat it is possible to add a few% extra water, but it also depends on the flour you use, they all react different, have different absorption levels and the dough i already quite wet so you should just experiment and see how the dough comes together and if it needs more water. If you increase the wholewheat percentage a lot, the bread will also change structure of course and become more compact.
Happy wholewheat baking!
Bernard Caesar says
Hi,
As usual a very well thought out presentation. The only question I have and it applies to all your recipes is the internal temperature of the bread when it finishes baking. I use internal temperature for my baking since I find it more accurate than just time and tapping. I baked this bread to 210F and it turned out well.
Thanks again
Bernard
Weekend Bakers says
Thank you Bernard for the suggestion, it is indeed a very good idea to add this information to our recipes. For wet dough we would aim for a the core bread baking temperature of around 96C/ 205F, so very close to your 210F. (The ideal average bread core temperature would read around 93.3C / 200F). Tapping is something we never do to be honest, because like you we do not think it gives accurate information. In Holland we say ‘meten is weten’ or translated measuring is knowing!
stevyn mcdonald says
just a quick question. why no autolysing (?is that the right term?) for this one? my hunch would have been the rougher wholemeal flour would need a while to accept the water?
(brilliant website by the way)
Weekend Bakers says
Thank you Stevyn,
There is no compelling reason really, other than that we use different methods for different recipes, keeping the process simple or trying things and liking the result, something like that. But it would of course be no problem to incorporate an AL in this recipe.
Vicente says
Hello again. So after several batches of the “Sourdough Pain Naturel” successfully baked, I finally moved to another recipe. This one here, as I love whole bread.
It have not gone so well though…
It tastes good, the crumb is light and full of holes, the crust is also ok, actually, very good. But… The dough didn’t hold it self when I took it out of the banneton . It immediately spread on the baking sheet, showing no structure. And consequently I got almost no oven spring (still some, but very little).
The resulting loafs (3) are short and flattened.
No problem the bread is still light and delicious.
But again I have trouble to find where to improve.
I thing in 4 possibles causes to the dough spreading.
1. Bad shaping. I don’t think this is the case, as my boules and battards are usually good, and this ones just looked fine. Also all 3 loafs had exactly the same problem.
2. To wet dough. Although I followed the recipe precisely, the differences in flour ask fpr adjustments, and , honestly, I’m not comfortable yet to find the proper texture of the dough when mixing/kneading. I mostly rely on mesure, which wont account for flour differences. So this is a very probable cause. But the dough looks ok during all the processes. I can tell that it was not really messed.
3. To little gluten structure. Again, I followed the timing. I can never say if the dough is to wet or under worked…
and the las suspect:
4. Over proffed. The poke test indicated perhaps a slight overproofing… But not much. Just a tad.
How can I tell where is the culprit?
What to look for when adding water to know it has being enough?
Once more, thank for this marvellous work.
cheers
vk
The bread still great! And way much better than anything I could get at the market.
Weekend Bakers says
Hello VK,
You do a really good assessment of your own baking. For us it is really hard to judge without seeing you at work to tell you exactly what went a bit wrong.
All we can say is that it is more of a challenge to work with a higher percentage whole wheat, you have less gluten, heavier dough, different absorption, so it takes a bit of time and effort to work it out and get a good result. We would advice to make a few batches with a smaller percentage of whole wheat (start with 30%) and also to make batches with a higher and lower percentage of water and make notes of the differences. Based on your own findings, start with a bit less water. If you still do not like the result, maybe try a different (brand of) flour. We use organic wheat and whole wheat flour.
Good to read that the bread is still very good and you like it.
Good luck with it!
Moniek says
Hi there, thanks for the wonderful and complete recipe! I never made a sourdough bread before, but it turned out quite good for a first attempt – a bit misshapen, but the structure and taste were already there. Since my mixer apparently isn’t built for kneading this type of dough (it practically launched itself off my countertop and stopped after 4,5 minutes), I was wondering if you have some suggestions on mixing/kneading the dough by hand? The dough is so sticky it was almost impossible to knead without adding more flour. In the long run, I am looking to invest in a decent mixer, but for the time being I’m going to have to do without.
Weekend Bakers says
Hi Moniek,
Sorry about the demise of your mixer. For now we would advice you to do the following, to keep the kneading by hand short: Knead for one minute, rest for 10 minutes, knead for one minute, rest for 10, knead 1 minute, then pick up the recipe from there. Some people oil their hands when kneading wet dough, this might work for you too.
Good luck with it and hope you will get your desired mixer in the near future.
Celine says
Hello from Sydney, Australia!
I made this bread today, and it turned out AMAZING. It was only my second time baking sourdough and your recipe was great, the instructions are very easy to follow. Thank you also for indicating what the dough temperature should be. This saved me a lot of time because it was cooler in Sydney today (about 18C) so I used warm water to mix the dough. Saved me a lot of fermenting time!
One thing I liked especially about your recipe was not having to turn the bread as often as the Tartine bread recipe. 2 stretch and folds are enough for me!
The only thing I did differently was baking the loaf in my Chasseur French oven. I baked at 230C with the lid on for 30min then removed the lid and baked for a remaining 18min. (A technique I learnt from other internet research).
Turned out perfectly. I will definitely be making this again. Will try to double the recipe next time!
Thanks again!
– Celine
Weekend Bakers says
Hi Celine,
Thanks for sharing your experience with our recipe. Sounds like you already made it your own. Excellent! It is always a bit strange to realize that as we approach summer you are facing the winter season. No matter when or where of course, winter is great for baking!
Wishing you lots of loaves and baking fun from our tiny Holland,
Marieke & Ed
Kacee Erhard says
Is it possible to only use stone ground whole wheat flour for your recipe? Have you tried and tested it that way? I read that the bread flour version has more gluten and I am gluten intolerant, but I also read that following this sourdough starter method reduces the gluten. I don’t want to increase it with a flour that contains more. Checked comments for a long way down and didn’t see this question. The Michael Pollan “Cooked” has a recipe that does, but I am trying to learn more about techniques, etc., and thought I’d ask what you’ve tried. I am still in the learning stage while my very first starter sits on the counter. Thank you for all your time and talent!
Weekend Bakers says
Hi Kacee,
First of all we do not feel 100% comfortable to give you advice on this subject because it is not really our filed of expertise. We do not know if it is a good idea to make this bread at all if you are gluten intolerant, because the amount of gluten will still be high, compared to using rye for instance or even gluten free flours in part as a substitute. We have not made this particular recipe with 100% whole wheat, but if you do you should of course know that the result will be a different loaf, much more compact with a denser crumb.
Nanda says
Ik heb dit recept nu een paar keer geprobeerd, maar elke keer wordt mijn deeg al redelijk snel een deegbal en is helemaal niet nat en stretchy zoals in jullie in bijvoorbeeld de Strech & Fold levain video. Ik gebruik bio meel en bloem van de Zandhaas en jullie zuurdesem cultuur. Gebruik een keukenweegschaal om alles af te wegen. Heb geen mixer dus moet alles met de hand doen (12-14 min en heb er op gelet dat het deeg 24 C is. Mijn deeg is echter helemaal niet zo nat maar lijkt wel een ‘gewone’ bal deeg… Vervolgens voer ik het recept zo uit al beschreven, echter is een stretch en fold lastig met zulk ‘droog’ deeg. En het resultaat is een compact brood wat helemaal niet naar een desem levain smaakt – haha. Ik doe ergens iets fout, maar waar?
Bedankt alvast voor het lezen en hopelijk wat tips :).
Weekend Bakers says
Hallo Nanda,
Als je 1 brood per keer maakt is het al een beetje meer een uitdaging om de S&F te doen, omdat je een relatief klein stukje deeg in handen hebt. Je doet alles goed, maar je deeg lijkt inderdaad te droog. We stellen voor dat je 15 gram extra water toevoegt per brood. Iedere zak meel en bloem is weer anders en wij merken ook verschil in hoeveel water we toevoegen omdat de ene batch meel meer vocht opneemt dan de andere. We maken dus continue kleine aanpassingen. Op basis van de foto’s kun je beoordelen hoe het deeg er uit moet zien en heb je hopelijk wat houvast. Een andere suggestie is om de verhouding tussen volkoren en tarwe aan te passen naar 50/50 zodat je deeg wat makkelijker en fijner met de hand te verwerken is en je wat meer glutenontwikkeling hebt, hetgeen ook weer helpt met de strech.
Hopelijk heb je hier wat aan en wil je het nog een keer proberen.
Happy baking!
Ed & Marieke
Al says
Maybe I need to get out more….this whole wheat is great! In fact everything I have tried from your web site has been excellent.
Currently have some San Francisco sourdough on the go in the fridge!
Only been making sourdough for six months having made my own starter from scratch; superior to the shop bought rubbish. Never going back to that!
Thanks for the inspiration!
Weekend Bakers says
Hi Al,
We know what you mean.
Stay in and bake is our motto! Especially in windy, wet and cold Holland at the moment.
So glad to get your excellent feedback.
Wishing you lots of loaves and inspired baking moments!
Ed & Marieke
Natalie says
Hi there,
Thank you so much for your great site! I have made your Tartine style bread and sourdough pain naturel many times now with great results so thank you so much for sharing your recipes and advice! Your advice on using less water when following American recipes has also been invaluable as this has prevented a lot of the disasters I encountered when I first started baking sourdough.
I wanted to ask whether the final proofing time could be lengthened by putting the dough, once shaped and in the banneton, into the fridge for 12+ hours? Also, would this help develop more of a sour tasting flavour?
The loaves I have made have great flavour but I would also like to try making more sour tasting versions. Would a longer ferment be the solution?
Many thanks for your help!
Natalie
Weekend Bakers says
Hello Natalie,
Thank you so much for your comment! Great to hear the feedback on the less water remark.
And the answer to your questions is yes. Yes you can retard the loaves in the fridge and it will help with the development of a more sour taste. You can check out more tips on how to achieve more (or less) sour in your sourdough in our posting on the subject here: www.weekendbakery.com/posts…ough-tips/
Wishing you many more wonderful loaves and happy baking!
Ed & Marieke
Ben Fisher says
Hello,
I’ve never paid any attention to dough temperature when baking bread at home (with instant yeast) – it just takes as long as it takes to prove, depending on conditions, and I’ve always used water from the cold tap. However, I’m keen to start exploring the world of sourdough, and it seems to be more important to have an idea about dough temperature in order to get predictable results.
I’m just wondering exactly how it works though. Someone with no idea about dough temperatures (me) might assume that water at 30 degrees C is only that temperature at the time you take a reading, and will then gradually move towards the ambient room temperature over a given amount of time. Given the very long proving times involved in sourdough production, doesn’t the dough just approach room temperature over the course of a few hours? Or once you’ve achieved a dough temperature of 24-25C at the outset, does the heat generated by the fermentation process maintain that initial temperature, even if the room is 20C?
Thank-you for your time, and the brilliantly written information on your site!
Weekend Bakers says
Hello Ben,
Yes, you are correct, but the advantage of starting out at this higher temperature is that the yeast can multiply in the first hour. After a while indeed, the dough of a single loaf will take on the room temperature. The bigger the amount of dough, the longer this will take. The mass and the fermentation process of a big slab of dough will make for a longer heat retention. The amount of time and temperature are of course closely related when it comes to bread baking, bakers can make optimum use of that knowledge, so we think it helps a lot to know the details, especially with sourdough .
You can check out some theory and tips on the subject here: www.weekendbakery.com/posts…mperature/
Happy sourdough baking!
Patricia says
I absolutely love your website, it is well presented and easy to follow instructions..
Just one question please. I have whole grain rye flour that I have grinded myself. I would like to know how to adjust your whole wheat levain bread to a 100% whole grain rye flour bread.
P.S. I have started my rye sourdough starter using your recipe. Thanks for the detailed description and photo’s. Much appreciated..
Weekend Bakers says
Hi, this will not be a success. Rye flour does contain almost no gluten. So you end up with a strange, dense bread. When using rye flour you have to use special ways of ‘building’ your dough and to get a nice structure you have to add some wheat flour. See 3 stage 70% Rye Bread with Raisins for how to bake with rye.
Caroline Van Hassel says
Hallo,
Ik heb nu al verschillende recepten geprobeerd, de smaken zijn heel goed alsook de korst en het kruim. Ik blijf wel altijd met hetzelfde probleem kampen, alles gaat goed tot het bakproces. Het lukt me niet echt om een brood met volume te krijgen.
Ik laat het zeker niet te veel rijzen en toch als ik het uit de rijsmandjes neem en het brood in de oven gaat bak het niet voldoende in de hoogte. Ik heb ondertussen gelezen dat dit kan zijn door het vochtpercentage? Zijn al jullie recepten gebaseerd op het werken met bloem die meer vocht opneemt dan de bloem die wij in Europa gebruiken? Zoja dan probeer ik de recepten met een lager vochtpercentage. Hebben jullie een gedacht hoeveel ik dit in percentage moet verminderen?
Wat ik een beetje mis in de recepten en niet alleen in die van jullie is het waarom van de handelingen. Ik zoek graag de logica uit van de zaken. Waarom zoveel water in het ene recept en minder in het andere, waarom het ene brood 2 keer stretch en fold, waarom verschillende rijstijden……
Ik probeer een recept te analyseren, te verstaan en te vergelijken. Ik ondervind dat door gebrek aan kennis me dit niet echt lukt.
Ik zoek naar meer uitleg maar die vind ik , buiten enkele basiszaken, niet. Misschien zoek ik het te ver -:)
Hele boterham, maar het is steeds met plezier dat ik jullie recepten uitprobeer de smaken zijn superlekker.
VG
Caroline
Weekend Bakers says
Hi Caroline, Het hoe en waarom staat voor een deel in de tips, en in onze bread baking tips sectie. Als je meer achtergrond wilt dan raden wij het boek ‘Bread’ van Jeffrey Hamelman aan. Hier staat maar achtergrond kennis in dan je lief is. Ook het (dure) boek The Taste of Bread van Raymond Calvel geeft veel info. Beide boeken zijn meer voor de profi bakker dan de thuisbakker maar geven goede achtergrond. Recepten gaan in vele kilo’s ipv 1 brood. Wij gebruiken voornamelijk tarwebloem van de Zandhaas in Zandpoort-Zuid, met dit bloem kun je alle recepten maken 😉
Jay Rubinstein says
I just wanted to thank you for a great site!
I’ve been sourdough banking for more than 10 years but since I found your site I’ve made the change to a rye starter and stretch and fold techniques. I’ve just used a double quantity of the levain recipe in a loaf tin with added seeds. Worked a treat.
Thanks for the hard work and thought you put into the site.
Weekend Bakers says
Hi Jay, thank you for your kind words. The stretch and fold technique did help to fire our love for good bread. The feel of the dough through time and stretch and folds is amazing. We love the process!
Susan says
Hi, I have time on my hands, so will creating more sets of stretch and fold (say 5-6 sets) improve
The crumb of my bread. Will this produce a more holey crumb.
I really enjoy your technique of stretch and fold. Almost theauraputic.
Susan
Weekend Bakers says
Hi Susan,
You will get a feel for the dough and the technique the more often you use it. As long as the dough cooperates you can do the sets, but it is not a case of ‘the more the better’. In general our recipes form a good indication of how much is needed and if your dough lacks a bit of plumpness, you can do one more for instance, but as soon as the dough does not cooperate anymore, there is no need to go on with it.
r rehkemper says
Hello Marieke & Ed
I love this recipe… you basically saved my life with the detailed descriptions!!! Thanks
Have you ever tried to make this bread but slowed down the fermentation in the refrigerator for that it ferments longer. I keep reading that the longer fermenting breaks down the anti nutrients in grains which make them more easily digestible. (even for people with wheat/gluten allergies!!!-NOT for Celiac folks though)
Thanks again,
Renee in Chicago
Weekend Bakers says
As we have a chronic lack of space in our fridge we never have retarded bread our self at this moment. Indeed the longer the fermentation the easier it is to digest the bread, the yeast and bacteria have done some work for you!
Grace says
I’m so excited! I made my first sourdough bread with this recipe and it turned out exceeding my expectation! It’s very tasty with just a enough sour taste, crumbs are creamy and open, crust is crispy!
I made my first starter from Peter Reinhart’s BBA book last week and wondering which recipe i should use to try out the starter. I could use the recipe in PR’s book but from my research on internet, i knew that the newer method is using stretch and folds. You guys got a great website and I was convinced that this is a good recipe to incorporate S&F. The only thing is that I’m from Canada we don’t have the same types of flour and also mine is not a rye starter. Anyway i just went ahead and made the bread yesterday. I wasn’t expecting that much because I didn’t see that much oven spring (may be i proof for too long?) and I had problem with my shaping that the top of loaf split open before it went into the oven. But all my problems were gone when I cut open the loaf. The crumbs were so nice!! And when I tasted it, I was really surprise at how good it was!
Ok….don’t wanna say too much. In short, what a wonderful loaf of bread and I love your website. Thank you.
See my pictures of the bread here: My personal notes on bread baking
Weekend Bakers says
Thank you Grace for your wonderful feedback. You should be really proud to have achieved this result with a first attempt at a recipe. The rest are details that you can fine tune as you make the recipe more often, the best way to learn! Over proofing could be the cause of not much oven spring but there could also be other factors like not enough steam and oven temperature for instance.
Keep up the wonderful baking and lots of loaves,
Marieke & Ed
David Rowthorn says
Could this be made with yeast instead of sourdough culture?
Weekend Bakers says
Hello David,
Yes that is possible, but there is more to it than just replacing the culture by yeast. You need to adjust times too, because with yeast, things will go quicker. Also, because of this, you will end up with a totally different loaf. We would recommend finding a recipe for a whole wheat yeast bread that already has all the right amounts and times.
Elvira says
Goeiemiddag,
Sinds vorig jaar september bak ik elke week dit heerlijke brood. Geen ander brood komt hier nog het huis binnen! 😉
Nou vroeg ik me alleen iets af: hoelang blijft desem goed in de koelkast als je het niet voert? Ik ga over een tijdje 5 weken op vakantie; kan ik het daarna weer gewoon gaan voeren en opnieuw gebruiken?
Ik hoor het graag, bedankt alvast!
Elvira
Weekend Bakers says
Hallo Elvira,
We hebben zelf alleen ervaring met twee tot drie weken koelkast en dat werkt prima. Of het ook vijf weken goed zal gaan durven we niet helemaal te zeggen. Als je verder geen keuze hebt dan stellen we voor dat je het net voor vertrek ververst en dan ‘fingers crossed’ en inderdaad bij thuiskomst voeren (en op basis van geur en al dan niet enthousiaste groei kun je wel opmaken hoe dit experiment is gegaan).
Succes ermee en vooral een heel fijne vakantie!
Marieke & Ed
Elvira says
Beste Marieke en Ed,
Nog even een berichtje om te laten weten dat het is gelukt: na 5 weken koelkast was m’n zuurdesem al na de eerste keer voeren enorm actief! Intussen heb ik er alweer verschillende broden mee gebakken, en het resultaat is hetzelfde — lees: geweldig — als vóór de lange vakantie, hoera ;-).
Groet!
Elvira
Weekend Bakers says
Hallo Elvira,
Wat goed om te horen zeg! Het desem heeft duidelijk ook geprofiteerd van een lange vakantie. Heel mooi om te weten. Met recht hoera!
Happy baking (weekend)!
Marieke & Ed
Mirjam says
I have put my starter in the freezer. After getting back let it come to room temperature and gave it a feed. Perfect bubbly.
Mila says
Mm I love your website! I’ve been picking a recipe pretty much every weekend and trying it out, the results have been fantastic (I also used your starter recipe!). I’m making this bread today, but I was generally curious if you have any tips on shaping triangle loaves. I have a triangle proofing basket. Last weekend I tried just shaping it a circle, then putting it into the basket in hopes that it will grow to be a triangle, but it just stayed a circle (delicious delicious circle nonetheless).
Weekend Bakers says
Hi Mila,
Thank you so much! To be honest we have never shaped a triangle before, but we guess that indeed it should be pretty much pre-shaped as a triangle before going into the basket, like you would also do with round and oval loaves. We found this for you to help you: www.hefe-und-mehr.de/en/20…rot-formt/ Think it could work, judging by the pictures.
Happy triangle baking!
Marieke & Ed
Mila says
Fantastic! Thanks so much 😀 I ended up doing something similar last weekend, but my crazy bread ended up expanding in both directions in the oven (up and down) and looked quite a bit like a triangular pillow. Perhaps the slashing I did wasn’t sufficient and it had nowhere else to go? The little boules I baked rose up okay. I’ll work on this next time (this weekend is high hydration rye bread, so I don’t get to slash it much).
Weekend Bakers says
We think your analyses could be spot on! Try to score deep enough, at the right angle and also right up to the edges of the bread. Bread always ruptures at the weakest points.
Lots of fun with the hh rye bread and happy weekend baking!
More tips on scoring your loaves and baguettes: www.weekendbakery.com/posts…onfidence/
christine says
I love you guys I feel so blessed to have found your site your breads are beautiful and all the help with all the recipes please add me to your subscription keep up all the amazing good work we all appreciate all your hard work so much
Weekend Bakers says
Thank you so much Christine! About the subscription: You can enter your email address here: www.weekendbakery.com/feed/ to get a feed of new postings. Hope this works for you or otherwise you will check back with us now and then.
You can also follow our baking adventures on twitter: twitter.com/weekendbakers
Thanks again and wishing you many happy baking days!
Marieke
Anna says
Hallo,
ik heb al eens eerder een vraag gesteld maar ik heb er nog een, namelijk dat mijn brood er niet luchtig uitkomt, hij is nogal compact en er zitten nauwelijks luchtgaten in.
Moet ik beter ‘vouwen’ of ligt her ergens anders aan?
Alvast bedankt
Anna
Weekend Bakers says
Hallo Anna,
Er is een kans dat het brood niet lang genoeg de tijd heeft gehad om te rijzen. Ook kan het zo zijn dat de manier waarop je het deeg behandelt een rol speelt. Vooral als je nog wat minder ervaring hebt met natter deeg heb je misschien de neiging om het deeg te veel vast te pakken en ook om te veel meel toe te voegen (onbedoeld ook via je werkbank). We kunnen je aanraden onze tips voor nat deeg eens na te lezen: www.weekendbakery.com/posts…ion-dough/
Wat betreft het rijzen is het heel belangrijk dat het deeg de juiste temperatuur heeft zoals in onze recepten staat aangegeven.
Zie hiervoor ook onze tips: www.weekendbakery.com/posts…mperature/.
Veel succes ermee!
Ed & Marieke
Anna says
Na het kijken van de stretch and fold video zie ik dat mijn deeg niet zo ‘stretchy’ is.
Zou dit inderdaad zoals jullie al zeiden door de temperatuur van het deeg en het behandelen van het deeg komen?
Moet ik het deeg langer mixen?
Heel er bedankt voor jullie tips!
Anna
Weekend Bakers says
Ja, dit speelt inderdaad een rol, naast het genoemde onbedoeld te veel toevoegen van bloem waardoor de structuur van het deeg verandert en het veel stijver wordt bijvoorbeeld. Dus niet bang zijn voor het natte deeg en gewoon doorgaan (gebruik een schraper om je te helpen het deeg te begeleiden) ook al is het heel plakkerig en krijg je deeg aan je handen. Veel oefenen en als vanzelf wordt je er handiger in waarbij je contactmoment met het deeg ook verkort en je minder ‘blijft plakken’. Als laatste kun je nog kijken naar het meel dat je gebruikt (zie ook: www.weekendbakery.com/posts…our-types/).
Als je een staande mixer gebruikt moet je zoals het recept aangeeft 6 minuten kneden, met de hand ongeveer het dubbele. Je kunt een minuutje langer kneden om te kijken of dit verschil maakt.
Succes ermee!
Marieke & Ed
Pim says
Note to people living in the province of Noord-Holland: the local mill in Oosterblokker (near Hoorn) sells excellent high quality flour they mill themselves. Also, they have a little shop which is staffed by people with a mental disability. They sell coffee and nice tarts and breads and sandwiches. Worth a visit!
Do check out their opening times though: www.broodbakken.nl
Pim says
Great recipe, will try it out soon!
However, I’m trying to cut on my wheat intake, and make more spelt breads instead. Since spelt has less good gluten development I’m struggling with it. You just cannot take wheat recipes and substitute the wheat for spelt.
I tried the spelt ‘fluitjes’ before and love them, but I’m more fan of whole grain. But.. I also like big bubbles in my bread… Nice, soft bread, like the Tartine bread (made this one today and it turned out INSANELY GOOD, thanks!)
Could you give me some hints on a recipe for a 65-75% whole spelt recipe that will rise properly and has good gluten development?
Weekend Bakers says
Hi Pim,
You are very right, it is much harder. Not from our own experience but we do know a fellow baker that makes good spelt loaves (a combination of whole spelt and finer spelt flour I think) based on our Pain Rustique recipe (www.weekendbakery.com/posts…-rustique/). You might want to try altering the hydration and times given in the recipe a bit to get to a good result.
Happy baking!
Marieke
Petra Robinson says
I made the bread again today, this time I did the 6 minute kneading on low spead with my Kennwood Standmixer.
The Dough was sticky but not wet, very easy to work with.
It is proofing now in its basket and will be baked in 1 hour and 20 Minutes.
I wonder how it turns out.
When I did it the first time I mixed it with my Danish Dough Whisk until it came togehter but was a shaggy Mass, the dough was Wet and sticky, not easy to work with but I am used to wet Dough.
The crumb had lovely big holes, the bigges holes more at the top.
The taste was wonderful but not enough salt for my taste so I added 2 more g. of Salt now.
I let you know how it turned out.
Petra Robinson says
I baked the bread last Night, used the Standmixer, did it per your instruction with the mixing and kneading time.
The Bread was Denser and could hold it shape better , but I prefer the crumb texture the way I did it the first time with minimal kneading.
I just used the Danish Dough Whisk to combine all Ingedients , no kneading, then did the fold and stretch and resting time as per your instructions.
Maybe I just do not like using a standmixer lol
Weekend Bakers says
Getting used to taking in less salt is something you have to do gradually> We adjusted the salt levels in our bread according to the new guidelines in Britain, found it a good idea because people get so much salt in their food each day. We did some tests with our bread friends and non of them noticed the difference which was great. We wrote about it in our newsletter a while ago:
Salt: How much goes into your bread?
Recently we took a closer look at the percentage of salt we put into our bread.
If you are a big bread eater, chances are high you get a lot of your daily salt intake via your sandwiches. The UK recently came out with a new standard of 1 gram of salt per 100 grams of baked bread.
We looked at our own baking and did a test with this new standard. For a standard pain rustique (750 g dough, weighing about 680 g after baking) this would mean lowering the added salt from 8 g to 6.8 g or from 1.17 g to 1 g per 100 g bread.
We tested and tasted the bread with new salt content, together with some bread friends, several times. Result: We all had a very hard time noticing any difference. There is a line below which it would become noticeable of course, but this new standard is no problem for us.
Petra Robinson says
I agree, I am very good with less Salt, but in bread, it needs a bit umph for me;)
To much Salt is not healthy, but in a whole loaf of bread 8 – 9 g. I think I can live with that:)
This is our fav. bread now, thank you so much for the recep and my Rye Starter is doing a fine job:)
Weekend Bakers says
Great to hear Petra!
Petra Robinson says
I have a question, when you say * Mixing * in your Recipes, do you mean by hand or with a Standmixer?
I thought in a Standmixer or by hand it is * Kneading * when you do it over a period of 6 Minutes?
It got me confused.
Petra
Weekend Bakers says
We normally mean with a standing mixer yes. But kneading would be the better word you are right. I will adjust it right away.
Thanks,
Marieke
Petra Robinson says
Oh good, I wondered about it and now I know. phewww
Petra
Petra Robinson says
This is one of the finest Breads I have ever baked.