

Daring to keep it simple can also produce great results…
Klik hier voor de Nederlandse versie
We started this recipe as a one-off experiment, thinking the result would not be that interesting, compared to the other bread recipes we already know and love. But the end result really surprised us. As you might expect, knowing some of our other favorite recipes, the key factors for this one are the same: time, timing and really good flour!
This recipe is the first to have a ‘dough calculator’ (see ingredients list).
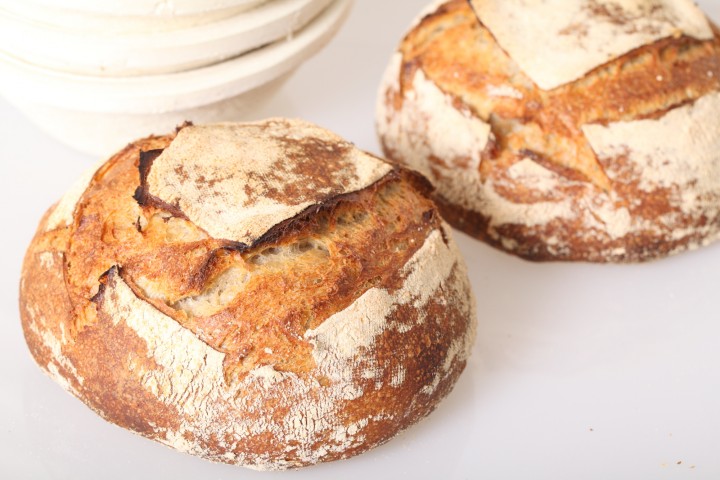
Although there does not seem to be strict definitions about French bread terminology, we simply call this bread ‘Pain Naturel’ or abbreviated PN. We chose this name because it stands for a basic yet full flavored sourdough bread, made just from ‘white’ bread flour. Using our own sourdough culture we found the bread gets a pleasant hint of sourness, which combines very well with the sweet flavor of the flour we use.
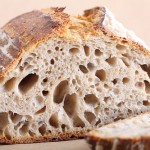
And especially because this bread is made with ‘white wheat flour’ only, it is important to get the best quality, organic, stone ground bread flour you can get your hands on. When you do, we truly believe you will be rewarded with amazing taste and depth of flavor, better crumb structure and the crustiest of crusts.
Enjoy the recipe and let us know what you think. Also check out our handy sourdough tips to get the most out of your sourdough baking!
Before you start

For this recipe we are going to make a starter named a poolish. A poolish is a type of wet sponge usually made with an equal weight of water and flour and a small amount of sourdough starter culture or yeast and NO salt. Making a poolish helps bring more taste and strength to your bread.
We use a sourdough culture which is made with 100% whole grain rye flour. A sourdough culture based on rye flour is easier to maintain, does not go into a slurry when you forget about it, is easier to stir because it has almost no gluten and smells very nice, a bit like fruit. It is also very forgiving in the amount you feed it. Normally we only feed it once a week, after our weekend baking we give it a few table spoons of water and rye flour, stir and ready!

| Ingredients for the Poolish | ||||
|---|---|---|---|---|
| 115 | g | wheat (bread) flour | ||
| 115 | g | water (room temperature) | ||
| 15 | g | sourdough culture | ||
| Ingredients for the Pain Naturel | ||||
|---|---|---|---|---|
| makes 1 loaf | ||||
| the poolish from step 1 | ||||
| 340 | g | wheat (bread) flour | ||
| 180 | g | water | ||
| 7.5 | g | (sea) salt | ||
Making the Poolish
In a bowl stir together the 115 g flour, 115 g water at room temperature with the 15 g sourdough culture. Mix it well until you have a homogeneous slurry that looks like very thick batter. Cover the bowl with clingfilm and let the prefermenting begin. After 12 hours at room temperature it should be bubbly, light and ready for use. So if you want to begin your bread making at 9 in the morning, you should make your poolish at 9 in the evening.

Note: We use European flour which absorbs a few % less water than American type flour. People using American type of flour should add 5-15 ml water to the final dough.
Making the Pain Naturel
Put the poolish starter and flour in the mixing bowl of your standing mixer and add 2/3 of the water (do NOT add the salt yet). Now start mixing and gradually add the rest of the water and let the dough come together. Knead for 1 minute, leave the dough in your mixing bowl, cover and let rest for 20 minutes (this technique is also referred to as autolyse).
Now add the salt and knead for another 4 minutes. Transfer the dough to a greased bowl, cover and leave to rest for 50 minutes.

Ideally the temperature of your dough after mixing should be around 24-25 ºC / 75 ºF. You should adjust the temperature of the water you add, so the total dough reaches this temperature. For us this means in summer adding cold water to this recipe and in winter (when our little bakery gets much colder then the rest of our house) adding water up to 50 ºC /122 ºF. You can measure the temperature of water and dough with a food thermometer. These measurements are important because they correspond with the proving times in the recipe.
After the first 50 minutes rest take the dough out of the bowl and onto a floured work surface and do one stretch and fold (a full letter fold, left over right, right over left, bottom over top, top over bottom; watch our bread movie or our stretch and fold method video to observe this technique if you are not familiar with it). Transfer to the bowl, cover and again leave to rest for 50 minutes. Now repeat the stretch and fold (full letter fold) one more time (so 2 times in total) and leave to rest for 50 minutes (so this is the third and last of your three 50 minutes resting periods). During each stretch and fold the dough should feel firmer and less wet.
Now it’s time to shape. Shaping is a tricky subject. It’s something for which everybody develops his or her own favorite technique over time. You can make a batard or loaf shape or a boule (ball) shape like you see in the pictures. If necessary you can learn more on shaping from a good bread book, like the ones by Hamelman or Reinhart, or the Tartine Bread book. Or take a look at our boule shaping video.
Preheat your oven to 230 ºC / 445 ºF conventional setting (at what stage you preheat your oven depends on how long it takes for your oven to heat through, some take 30 minutes, some, like ours, with stone floors take a lot longer, up to two hours).


Transfer the shaped dough to a proofing basket / banneton, cover and leave to proof for about 2 hours and 30 minutes (provided your dough has a temperature of around 24-25 ºC / 75 ºF, also check our tips on dough temperature). When you think it has risen enough, use your finger to carefully make a very small dent in the dough. If the dent remains, the bread is ready to bake, if the indentation totally disappears, the dough needs a little bit more time.

Now your loaf is ready for the oven. Slash the top of the loaf with a lame or bread scoring tool. To get a nice crust, try to create some steam in your oven by putting a small metal baking tray on your oven floor when you preheat the oven, and pour in half a cup of hot water immediately after putting the bread in the oven. Release some steam by setting your oven door ajar (perhaps with the help of a wooden spoon or oven mitt) 5 minutes before the bread is ready. If you are going to create steam with a baking tray, you may also want to turn your oven temperature a bit higher, because you are going to lose some heat in the process.
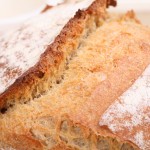
After 45 minutes of baking your loaf should be ready. Transfer onto a rack and leave to cool. This loaf also keeps very well in the freezer. But please make sure to eat at least some of it while fresh. This bread is great with just about anything, but also very tasty on its own.

Pain Naturel Time Table
Day 1 21.00 Make starter let ferment for 12 hours at room temperature
Day 2 0.900 Make final dough
- 09:00 – Add flour and water to starter, mix for 1 minute
- 20 minutes rest (autolyse)
- 09:20 – Add salt
- Knead for 4 minutes
- Rest for 50 minutes
- 10:14 – First stretch and fold
- Rest for 50 minutes
- 11:04 – Second stretch and fold
- Rest for 50 minutes
- 11:54 – Shape
- 12:00 Final proofing 150 minutes (2.5 hours)
- 14.30 – Bake for 45 minutes at 230ºC / 445ºF
- 15:15 – Your loaf is ready!
And if for any reason you are not able to get your own sourdough culture started, it is possible to ‘kickstart’ the process by buying a packet of sourdough starter. We know that Kensington Sourdough, based in Toronto Canada, are sending their dried San Fransisco Sourdough Starter all over the world since quite a few years now. Bakers are sending us positive feedback about their baking results with our recipe combined with the Kensington culture.


EJ says
I’m trying this recipe for the third time and my loaves are kind of small. So I’m doubling up this time. Can I bake this larger loaf the same way as the single? Or should I split it to the two smaller boules? Thanks!!
Weekend Bakers says
Hello EJ,
IF you want to bake one larger loaf, you have to adjust the baking time. This loaf will be around 1.5 kg, so the indication for the baking time would be 60 to 65 minutes. The other thing you can do is indeed split the dough into two equal pieces and bake two loaves. Then the baking time will stay 45 minutes.
Enjoy your baking!
Brenda says
I made Sourdough PN today, following your recipe exactly. I recently bought the Kensington Starter, and in their paperwork they suggested your website. Made me DOUBLY happy to have a wonderful bubbly starter, and a foolproof recipe to go with it. I’m telling you, my husband and I just kept MARVELING over how absolutely perfect the bread turned out. I’ve always enjoyed baking, but had not mastered sourdough…until now. Thank you!
Weekend Bakers says
So wonderful of you to share this with us. We are always so happy to hear a recipe working well for other bakers. And especially when you have already tried before and maybe got a bit disheartened about the whole sourdough bread baking. We are also sure Ben from Kensington thinks it fantastic the combination of the SF starter with our recipe turned out so well for you.
Wishing you many more excellent loaves and many happy baking moment!
Marieke & Ed
Pat Sharpe says
Been making sourdough bread for over a year but still not getting a nice big rise. (Tastes good though). Bought some Kensington starter and am on day 2. Once it’s ready, I’ve been directed to use this PN recipe. I’m surprised to see this bread is same day (other than making the poolish the night before). There is no cold retard overnight so is sour tasting and does it score easily? Can I cold retard it and if so, for how long? Thanks in advance.
Weekend Bakers says
Hello Pat,
Take another look at the recipe, it does ask you to make a poolish the night before 🙂
We would also ask you to first make the recipe, exactly as described before changing anything, so you have a good starting point, also to compare with if and when you want to change things, like cold retard (provided you are looking for more sour notes with a slower proofing process).
We are very satisfied with the taste of our PN with more subtle sour notes and a hint of ‘sweetness’ . We do not like it when sourness is too overpowering.
But look at our tips about more and less sour and more helpful hints if necessary: www.weekendbakery.com/posts…ough-tips/
We have no problem scoring the loaves, but if you do not have much experience with it, then we do have a few pointers for that too:
www.weekendbakery.com/posts…onfidence/
Hope this helps.
Good luck with the sourdough baking!
Carley says
I’m looking to get into trying the add different things to my bread. Jalapenos and cheese. At what point should I add these?
Weekend Bakers says
Hello Carley,
There are a few ways you can do this. The most straightforward would be to add the cheese and jalapenos at the end of the 4 minutes kneading process and incorporate at slow speed for about 1 minute. You can also take the dough out, roughly make a rectangle shape, sprinkle on the cheese and peppers then roll it up and carefully pinch and mold the dough so everything is well distributed. Then let it rest for 50 minutes like it says in the recipe and continue with the rest. You can also take a look at the method of The Perfect Loaf for their method www.theperfectloaf.com/jalap…ugh-bread/. The cheese and peppers are added 30 minutes into the bulk fermentation in 4 stages.
We do not have experience with the incorporation of cheese in this recipe ourselves but we hope it will be great.
Enjoy the process
Carley says
Update – it worked! I put the cheese and pickled jalapenos after the 4 minutes kneed and continued to kneed for 1-2 minutes.
Turned out fantastic
Weekend Bakers says
Hello Carley,
Thank you for sharing your result. Excellent and inspirational !
Enjoy your sourdough with all the extra’s
David Macleod says
Hi there.
In the first few paragraphs you say white bread flour but in the ingredients you say wheat flour. Which should I use?
Weekend Bakers says
Hello David,
Sorry for any confusion on our part. It’s caused by us being from Holland and the lack of (or not comparable to other countries) a ‘flour system’. So for this recipe we use what we in Holland call wheat flour (We buy the best organic quality we can find from a good mill with a protein content of 12 to 13 %). On the bag in Holland it says wheat flour ( or in Dutch ‘tarwebloem’) but this quality and type of flour comes closest to what you very probably call bread flour. So we use wheat flour that is best suited for baking bread, without (most) bags ever saying anything like ‘bread flour’ on the label.
Please let us know if you have any more questions.
Marieke
Paloma says
Do you think I can add some toasted walnuts?
Weekend Bakers says
Hello Paloma,
The purpose of this recipe is to let the loaf ‘shine’ based on good quality flour and the method to develop a full and complex flavor. Adding walnuts will change this ‘objective’, and the walnuts will become the star of the show, adding a lot of taste and also texture. So we would always advice (if you have not done so yet) to first make the recipe as described. Having said that, there will be no problem or modifications needed if you add some walnuts to this recipe.
Enjoy your sourdough baking!
Paloma says
Thank you for your prompt reply. I have made this loaf now at 15 times and truly love. I will give it a try with the walnuts and let you know how it turns out. I did try your Loaf with Toasted Walnuts, Figs and Prunes recipe and I love that one too.
Weekend Bakers says
Thank you Paloma, for letting us know. As an experienced baker, also with this recipe, which undoubtedly you have made your own after 15 bakes, we know the walnut version will also be excellent!
Shandy says
Is it important to baked for the entire 45 minutes, or if my internal temp reaches 95C can I remove my loaf? I don’t want to underbake but the loaf seems like it will be overdone if I bake for the entire 45 minutes.
Weekend Bakers says
Hello Shandy,
Yes,measuring is excellent. The baking time may vary depending on the workings and true temperature of your oven and a lot of bakers do not measure or cannot measure the core temperature of their bread. But if you can, then this is a very good way of determining if it’s time to remove your loaf. So, if your loaf is ready at 42 minutes for instance, you can of course take it out.
Best of luck with the baking and be careful with the measuring and the hot oven!
Sue-Ann says
Does it make a difference if I am using an all purpose flour?
Weekend Bakers says
Hi Sue-Ann,
Yes, that would not be the first option to use for this recipe. All purpose flour usually has a protein content of 10 to 11%. For this bread, for strength of the dough and taste of the bread it is best to get a very good quality (organic) bread flour with a protein content of 12 to 13%. If this is not possible for you, then you can use your AP flour, but there is a bigger chance the dough will not rise as good or might collaps, because of the lack of gluten (strength). Another aspect is the absorption of water. Stronger bread flour is also able to hold more water, something that is also important with these higher hydration dough recipes.