

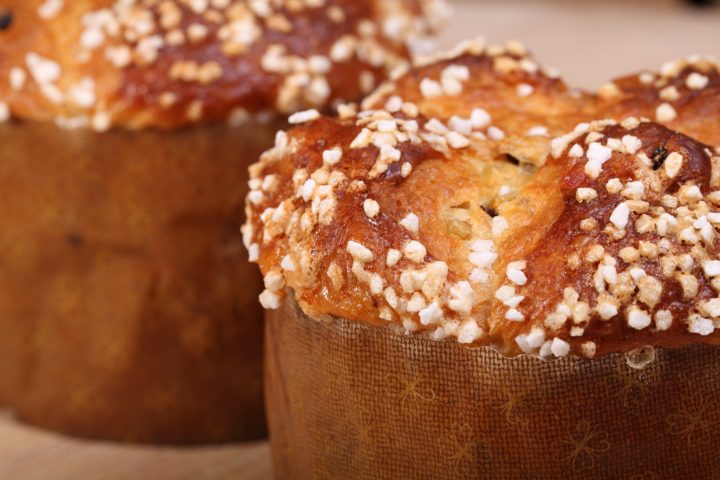
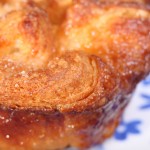
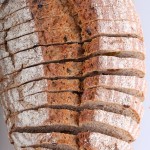
This Italian festive bread is the fluffiest we ever baked!
Dutch version coming soon…
This is a journey to find the ultimate panettone recipe, like the road we traveled to get to the best croissants.
We always take our time and go through several attempts to learn and adapt and modify until we are satisfied with our (version of) a recipe.
So we started the panettone adventure one Christmas and had our favorite version somewhere before Easter the following year.
Baking a good traditional panettone was always on our list. We baked panettone-like breads in the past, but never the original version with sourdough and long mixing and fermentation times.
We think this recipe is good enough to share with you and will give great baking fun! And of course we will keep adding more detail, tips and tricks as we gain more experience with future bakes and answer any questions you might have in the comment section below.


Update 1
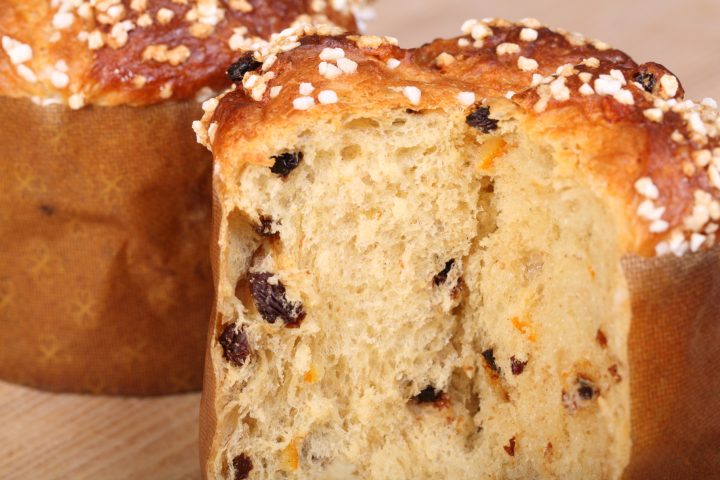
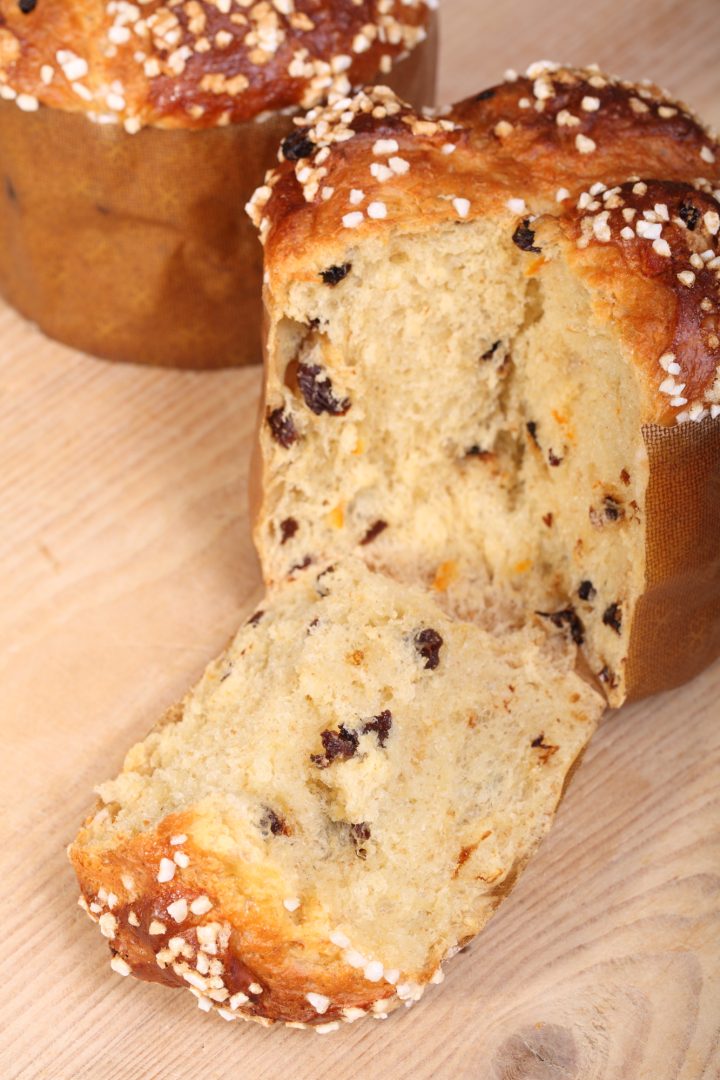
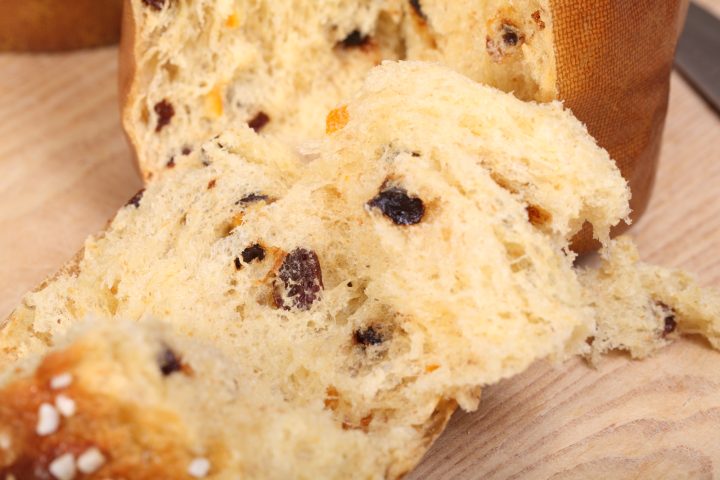
We baked the panettone several times and each time with great result and very much to our satisfaction. Because we liked it so much we did not change much. We did add the pearl sugar after the first try, which we like a lot because of that extra crunch to accompany the fluffiness. We made a version with candied peel, but have to say we still do not mind leaving it out and adding some cranberries for example, because the peel needs to be of great quality and not too overpowering to make it work.
We are also not a fan of the addition of essences or (artificial) panettone aromas, as they tend to overpower and coat the inside of your mouth a bit too intensely.
Update 2
We made a video of the panettone making process, so you can see the quality of the dough, the stretching process, the filling of the molds et cetera, before you start your own baking. The panettone were baked in our normal household oven. Hope it helps you get a great result!
We also made a version, using the Italian Caputo blue flour with 12.5% protein and it did the job very well, giving the dough lots of strength and a lovely fluffy and airy crumb in the end.
Pandoro
We also made the cousin of the panettone, the pandoro. It contains much more sugar and butter than the panettone, has no filling in the shape of raisins or peel and is also lots of fun to make. The smell of the fermenting dough of both breads is amazing. If we have to choose at this moment we like the panettone best of the two, it is just a little bit more exiting and it also tastes better when not completely fresh from the oven or after some time in the freezer.
Finding a good recipe to start with
The first thing we do when tackling a new recipe is finding a good basic and above all trustworthy source to start with. We browsed our baking bookcase and decided to use the ‘panettone with natural starter’ recipe from the, excellent but sometimes hard to read for a home baker, book ‘Advanced bread and pastry’ by Michel Suas. Because this book is aimed at professional bakers it takes some advanced thinking and calculating to get to a recipe that is doable and fun for a more experienced home baker. Also his instructions are sparse and scattered. Hopefully you will not say this about our recipe but you have to allow us some time to still improve on the version you’ll find below.
Other sources we consulted for our recipe are:
- The Wild Yeast blog
- ‘The fundamental techniques of classic bread baking’ by the French Culinary Institute
- ‘The Italian baker’ by Carol Field
- Our own sensible baking heads
We want to share with you our own attempts to get to a recipe that we are totally content with and that will work for all slightly experienced home bakers. Maybe these attempts will give you the inspiration to give it a try too or to give us some advice based on your own experience.
The basic recipe
We started by recalculating the amounts of Suas formula. The first attempt we stayed really close to the recipe steps, which are spread over three days. The first day of the process works well if you make large amounts of dough, but for home bakers we found it is no problem to skip this step and still get a great result. That is why our basic recipe version is a two day process, where the steps of day one and two are merged.
This recipe yields two panettones of around 460 grams each. The dough is extremely wet which can make you doubt if your amounts are right, but have faith!
Day 1
This step of making the initial dough is ideally done in the evening. This way you can continue with the recipe on day 2 in the morning, because you must take into account the long proofing times of the final dough (up to 6 hours for the final proofing alone).

Ingredients for panettone dough nr 1
220 g strong white bread flour (13-14% protein)
120 g water
1.5 g instant yeast or 4.5 g fresh yeast
20 g sourdough starter (100% hydration)
one egg yolk (20 g)
45 g sugar
4 g diastatic malt (optional, gives great color)
45 g butter, softened
Making dough nr 1
In the bowl of your standing mixer add all the ingredients from the list above.
Mix on a low speed for no more than one minute, until all ingredients are combined. You could call this a ‘shaggy mass’.
Cover the bowl and leave to rest overnight (for 12 hours) at room temperature.

Day 2
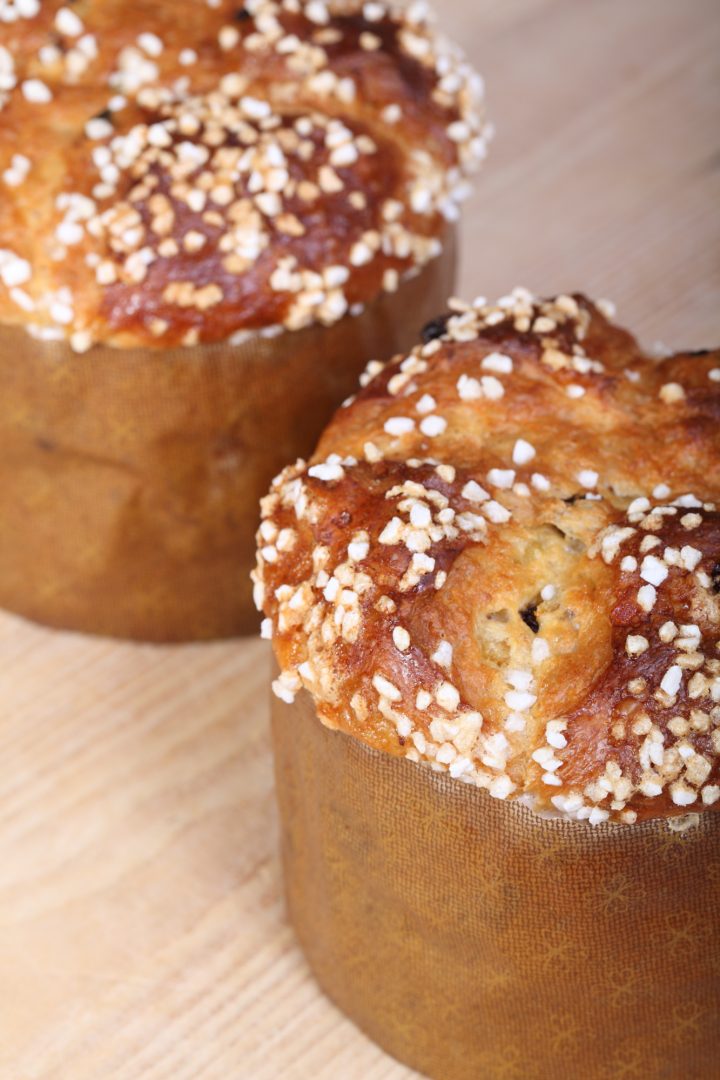
Panettone is usually made in classic panettone molds you can also find in our baking shop. You can also use a well greased baking tin. The dimensions should be around 13,5 cm / 5.3 inch diameter and a height of 9.5 cm / 3.7 inch.
Panetonne needs to cool upside down after baking, because the delicate and fluffy bread would collapse if you leave it standing up after baking. You can, rather ingeniously, prepare the molds for this by sticking bamboo skewers into them like you see in the picture. Directly after baking you hang the panettones upside down between for example two chairs. Alternatively you can also lay the panettones on their sides on a pillow after baking, so we have read but not (yet) tried.
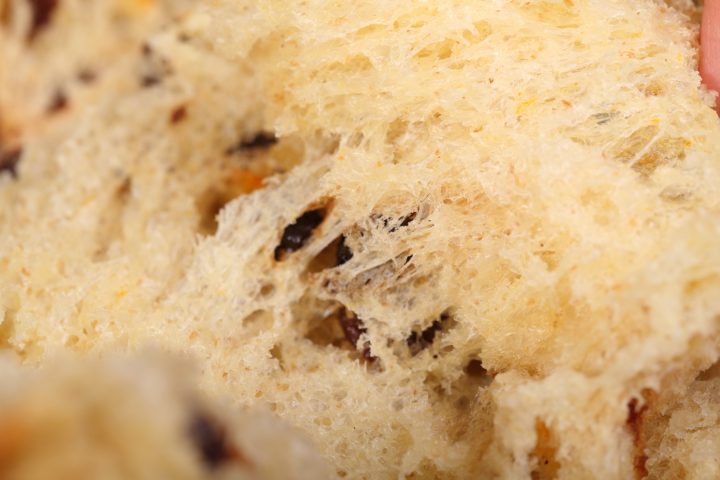
The dried fruit does not have to be soaked before adding, because it will spend many hours in a very wet dough.


Ingredients for the final panettone dough
The dough you made on day one
60 g strong white bread flour* (13-14% protein)
30 g water (part 1)
one egg yolk (20g)
2.8 g salt
1 tsp vanilla extract
1 tsp orange zest
50 g sugar
70 g butter, softened
30 g water (part 2)
10 g honey
70 g raisins
70 g candied orange peel**
25 g candied lemon peel**
some egg white for brushing the tops
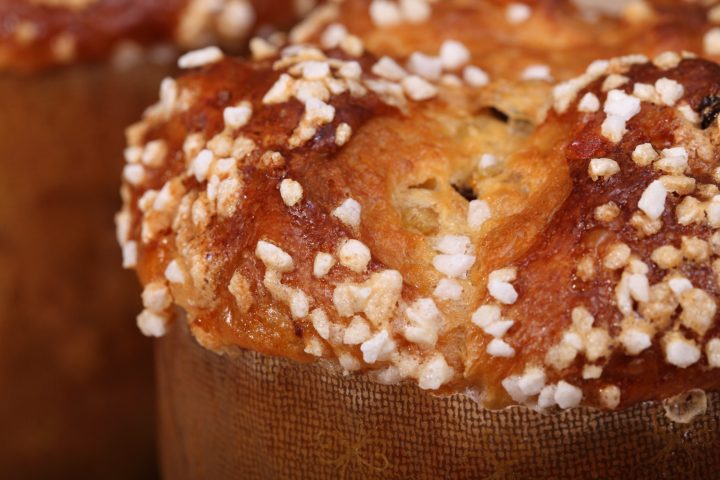
pearl sugar for decorating (optional)
*We used French type 45 in both the first and final dough and added 3 grams gluten powder to the final dough for more strength. But note that this French flour we used already had 12% protein.
**Due to lack of homemade candied orange and lemon peel we used 95 grams of dried cranberries for these test batches.

Making the final dough
Start by combining dough nr. 1 with the flour, water part 1, egg yolk, salt, vanilla and orange zest.
Knead for 4 minutes (stand mixer on speed 2) to develop the dough. The dough should be well developed before adding sugar or butter, as both sugar and butter prohibited development of the gluten.
Then add half the sugar and knead for 2 minutes. Then add the second half of the sugar and again knead for 2 minutes.
Now gradually add the butter in stages during the next 4 minutes of kneading.
Next add the water part 2 and the honey and slowly knead (lowest possible speed so the water will not slosh out of the bowl) for 2 minutes until the water is completely absorbed by the dough. You should should now have a smooth yet very sticky dough. You should be able to pull a window pane from the dough like you see in the picture.
When you have reached this stage you can add the raisins and candied peel and incorporate them into the dough. Knead/mix for 1 minute at a low speed and all the fruit should be distributed through the dough.
Cover the bowl and leave to rest for 45 minutes.

After the rest, perform two complete sets (so one set directly after the other without rest in between) of stretch and folds and see the dough develop from very slack into a plumper shape that somewhat resembles a ball. Use a dough scraper and use some flour on your bench and dough to make this task easier and less sticky.
Cover the dough and let rest for 25 minutes.
Now divide the dough into two equal parts and pre-shape them into a flat ball resembling shape.
Again cover and let rest for 25 minutes.
Shape the two pre-shaped pieces of dough into still sort of flat balls as well as you can, use some flour and a dough scraper to tuck the dough under. Make sure the shapes will fit into the panettone molds. Quickly with one swoop of your dough scraper lift each dough ball and put them inside the panetonne molds. Cover the molds with floured cling film.
You are now at the final proofing stage which will take, depending on your room and dough temperature, between 4 and 6 hours.
Baking the panettone


When the top of the dough is starting to reach the rim of the paper mold, preheat your oven to 175 °C / 345 °F, conventional setting. Make sure you have something prepared to hang the panettones upside down as soon as you take them out of the oven. We used two chairs for this.
The panettones are ready for baking when the top of the dough is slightly above the rim of the paper molds. Just before you take the breads to the oven you can cross cut with scissors and/or glaze your panettones and sprinkle them with pearl sugar (use egg white to make the sugar stick). Take the molds to the oven. You can try and add some steam during the first stages of baking.
Bake for 40 minutes, keep an eye on the color of your panetonne. We had to turn the oven down to 160 °C / 320 °F after 15 minutes to stop the browning process. Take them out of the oven and immediately hang them upside down so they will not collapse and be careful as the panetonnes are very fragile at this stage. Leave them hanging for at least two hours, so the crumb can stabilize.
Enjoy the fluffiness while they are still a bit warm!

antoine hanna says
Followed instructions to the letter, but the dough came out too loose/runny. Used 13% protein bread flour. Any advice? Thanks
Heidi says
Hi Marieke and Ed,
Thanks for sharing your recipe. May I ask you these questions?
1/ My country is always between 28 to 31 degree Celsius. For the dough number 1 do you know how long I should proof/rest the dough?
2/ For the Final Dough I just follow the directions you gave or I have to shorten the time?
3/ I just have 4 in mold (11.2 cm in diameter and 8.5 cm in height? Do you know how long and what temperature I should bake it?
I am sorry for asking too much. Hope you will help me. Thanks in advance
camilla keeling says
Thank you! Fantastic recipe..you made it so clear and straightforward… the most difficult bit was making a panettone case … grease proof paper stuck together with flour/ egg white glue and a few staples… worked fine!
Elke says
What an awesome recipe, thank you so much! The instructions were easy to follow, and the videos helped to understand what to look for in the dough development at each stage.
I had tried another recipe before and the results were yummy but the panettone was very dense. This one came out amazingly fluffy and delicious.
Kriti Agarwal says
Hi,
I tried the Panettone recipe and baked in a homemade parchment paper panettone mould. Inserting the wooden skewers turned it upside down for cooling. But after the bread completely cooled, I saw big stretched holes where the skewers were inserted. The paper was already slipping out.
The panettone came out ultra delicious but cud u plz guide more on the hanging technique with handmade liners? Unfortunately we don’t easily get the readymade liners here.
john says
I made one of these years ago, try inserting the skewers about an inch (2.5cm) from the base, or higher, it should hold ok, and not tear
camilla keeling says
Insert skewers – I used metal barbecue ones before filling with the dough – it forms a seal as it bakes around them and the slide out cleanly when it’s cooked. I made the cases out of grease proof paper glued with egg white and flour with staples on the join- they stood up fine. Inverted over a couple of bread tins ..
Janice says
Hi is it possible to double this recipe using the same starter? Any modifications needed? Also my 100% hydration starter is newly made at day 6 of feeding not sure if mature enough. Quick response much appreciated as I intend to start tonight!
Janice says
Hi is it possible to double this recipe using the same starter? Any modifications needed?
Dede Liss says
dear Marieke and Ed
I will be adjusting your panetonne recipe to fit the paper panetonne cases I already have which are W117mm x H85mm.
Approximately how much dough will they hold? And, what would be the approximate weight loss % after baked
Ann P says
I’ve made this recipe exactly as printed several times with excellent results. For this holiday season I found myself without bread flour of an appropriate strength and instead of strengthening an artisan 11.5% flour with vital wheat gluten I instead mixed it with extra fancy durum flour (15%) to yield a blend having 13.5% protein. I had to add a bit more water to account for the durum flour. The resultant panettones had a beautiful yellow color and excellent crumb and flavor. This is a “mistake” I plan to keep in my repertoire.
Alke says
I made the panettone today- awesome. Excellent and very detailed recipe…
I was wondering if I can add nuts (pistachios, toasted hazelnuts etc)? Or would this be too heavy for this delicate dough…
Have you tried adding freeze-dried fruit?
Thanks
Dimah says
I was planning to try Panettone from Advanced Bread and Pastry and came across here.
I’ve a question. In the book:
The levain Formula:
3/4 oz bread flour
3/8 oz water
3/4 oz starter
– Mix until all incorporated
– Feed 3 times a day and allow to ferment 4 hours at 29C
I’m using sourdough starter to make the levain. I did not get his instructions about feeding the levain 3 times a day. why do I have to feed the levain and how? should I discard anything? This is not clear? Hope you can help.
Weekend Bakers says
Hello Dimah,
How many panetonne do you want to make in one go? The recipe as described works when you want to make 10+ panetonne, but for one it would mean refreshing a tiny amount of levain. It will be something like 25 grams that needs to be refreshed, so you discard 10 or 12 grams. We just do not find that very ‘workable’ for the home baker so this is one of the reasons we made our version of the recipe.
Dimah says
Thank you so much for your reply.
I wrote the levain formula which is for test as described in the book. The final dough will be 2 lb which means two panettone according to size of the mold.
“1 lb 2 oz (500 g) for a mold with dimensions of [5 1⁄4 inch (13 1⁄2 cm) diameter 3 1⁄4 inch (11 1⁄2 cm) height]”
I’m planning to make one panettone only to see the results but the instructions in the book were confusing.
Now, it is clear for me. Thanks for your help.
YC says
So I made panettone and realise that after allow it to cool, there was some shrinkage at the sides. Can you offer any insights? Underproof? Too much dough?
Weekend Bakers says
Hello YC,
A tiny bit of shrinking is perfectly normal. When you use the paper molds you also see a bit of wrinkling on the paper because of this. We do tend to see that people have a tendency to under-proof, so next time maybe take it a little bit further. The upside down cooling is also essential for the shape, we assume you did this too.
evren bingol says
so what is the secret to crumb structure being more open.
More Acetic starter vs Lactic
Weekend Bakers says
Are you making a 100% sourdough based panettone?
Our recipe is a hybrid version with also a small amount of yeast.
Lactic feels at home in a more wet environment, too much acid can stop the yeast from growing and making bubbles. So in general the lactic should have the upper hand and your dough should have high hydration for your open crumb structure. Using the right type of flour that can handle the hydration and proofing up to the right point is also very important.
Alex says
Hi! I am trying out this recipe at moment, and it is going well for now, I am still in the phase one of the process. I do have a question though, which has just occurred to me. Since the dough will sit for a long time on room temperature, with raw egg yolks in it, won’t the yolks go bad or something? Will it be safe for consumption? I have small children, I would love them to taste the panettone once done, but I am a bit worried about this. Thank you in advance for your reply!
Weekend Bakers says
Hello Alex,
We do understand your concern. For us it has not been a problem but it is always good to be on the safe side when your children are concerned. We have a few suggestions (probably for next time). You can add the first yolk in the final dough and not in dough number one. You can use pasteurized eggs or you can replace the egg yolk with some (butter)milk or yogurt. There are lots of substitutes for egg yolk to be found if you google a bit(like soy lecithin for instance), but we do not have the experience to tell you which would work best.
Hope you will be able to enjoy a great panettone with your family!
Greetings,
Marieke & Ed
A Winter says
Sourdough cultures have wonderful preservative qualities! And as you are inoculating the dough with the good microorganisms at the get go, the bad ones don’t have a chance. None of the microflora will survive baking anyway. If the eggs did go bad, I promise you would know and no one would want to eat the bread.
Lauren says
Ready to bake
(4)
Yr recipe solid
Dough
Elastic and balloon thin
Merci
I’m sure the process will
Reveal delight
Thank you fir your thoughtful
Recipe
Weekend Bakers says
Thank you for finding is useful!
Charles Love says
I tried this today. The texture and taste was wonderful but the top deflated half way through the bake. I used 12% flour and it had a good knead. I left it until it rose to the top of the paper but wonder if this was actually too much and it in effect over proofed?
Weekend Bakers says
Hello Charles,
Sorry to hear about the deflating, but glad the taste was already to your liking. It could very well be over-proofing, maybe a big air bubble on top?
If possible you can try the recipe with very strong bread flour or Italian flour with 13 to 14% protein or add some gluten powder. Alternatively you can also try to use some vitamin C with your current flour to give the dough extra strength.
Adding a tiny pinch to your dough can help improve your baking result. Professional bakers can buy ‘commercial grade’ ascorbic acid, but home bakers can also use crushed vitamin C tablets (it’s effectively the same stuff). The recommended amount is 0.07%. So this means that for this recipe, with 280 g of flour, you can use about a quart of a 1000mg vitamin C tablet and you will be close to the required amount. Grind the tablet to a fine powder and add it to the flour.
Hope you get the result you want soon!
Will Shaler says
I have had this problem with “regular” bread when the amount of protein in the flour is not enough to support high hydration; I expect this caused your problem and not over proofing.
I’m not a fan of dough conditioners and would choose to boost your protein level with added gluten as recommended by the Weekend Bakers.
Lauren says
Baked in Florida want to send to California
Shelf like?
Normally pretty gd eh?
Gd looking recipe
Gluten stretchy
Merci
Weekend Bakers says
Hello Lauren,
We do not completely understand your question, we’re sorry.
Sjoukje Bouma says
Hallo Weekendbakery,
Can i use a wheat flour starter instead of rye? Or do you have a specific reason why you are using rye?
And during proofing-time, what is the best temperature to keep the dough? I have a proofing-oven, is that an option or is it better to proof at room-temperature, where it’s about 19/20 degrees.
Thanks for your incredible recipes!
Greetings Sjoukje
Weekend Bakers says
Hi Sjoukje,
Yes you can use the wheat starter no problem, we just use the rye because this is our favorite for using and maintaining. We would encourage you to use the proofing oven, it is a great thing to have. We would advice to proof at around 25 C and expect the proofing to go at the quicker end of the 4 to 6 hour spectrum, so keep an eye on it.
We hope it will work out great!
Enjoy your holiday baking,
Ed& Marieke
Weekend Bakers
Viroonrat Trapcharoen says
Hi there
I was wondering about type of flour. In the recipe, it calls for strong flour which should have 13-14% of protein content. But you used T45 plus small amout of gluten powder which I believe they will have protein lower than 13%.
Just want to make sure before baking again cause I failed once with T55 flour
PS. Your crossiant recipe is the best ever!!
Weekend Bakers says
Sorry for the late reply Viroonrat,
We sorry if there was confusion, because you expect the type 45 to have low protein. But the Type 45 we used had already 12 % so to get it to just over 13% we used the 3 grams gluten extra (we clarified it in the text now). We also more recently used Manitoba flour which gave great results.
Hope you will be able to give it a try and great the croissant recipe worked out well for you too!
Greetings from Holland,
Ed & Marieke
Cass says
If I wanted to put limoncello cream inside how and when would I do it? Thanks!
Weekend Bakers says
Hello Cass,
We have never tried this, but would suggest doing this after baking. With lots of cream and mascarpone additions you see people make a sort of pie, slicing the panettone horizontally and putting cream on the layers then stacking them up again. There is not much room to pipe something in the loaf, unless you take some crumb out first. You can google ‘filled panettone’ to get suggestions for how that would work.
Jessica says
I’m not familiar with using sourdough starter. Any tips there?
Weekend Bakers says
Hello Jessica,
You can read about our method of making a starter culture yourself here:
www.weekendbakery.com/posts…asy-steps/
Alternatively, if you could ask a baking friend for some that is already up and running and that you can start to use and maintain right away, that would also be great of course.
The 100% between brackets with the sourdough starter you see in the ingredients list means you use an active starter that consists of equal parts water and flour.
Hope you will enjoy your baking!
PS: This is a very challenging recipe for the more novice baker, so as an alternative you could also try the Christmas bread (stollen) that is only yeast based and really very delicious!
www.weekendbakery.com/posts…s-stollen/
Elaine says
Hi We have made this x 2 and its turned out lovely
Wanting to make some for Christmas gifts how long will they last?
Thank you
Weekend Bakers says
Hello Elaine,
We would advice storing by room temperature for no longer than a week. It has no added conservatives like industrial bread, so the best thing would be to present it as fresh as possible and bake it one day in advance. If you want to make it weeks in advance we would recommend wrapping it well and freezing it after cooling.
Enjoy your baking and sharing this season!
Lawrence Leason says
Hi there
Thanks for this recipe which I’ve tried with interest. The first time round I couldn’t develop enough strength in the dough when making the final dough (before adding the butter and sugar). Hence the dough was quite compact and actually raw in the middle! Today I’ve started again being more careful with my measurements (I got confused by water part 1 and 2). But still the dough is very liquid and not at all developed in the mixer and I’m hesitant to go to the next stage without checking out with you what might be happening? Also I’d like to make it 100% sourdough – have you tried omitting the yeast, increasing the levain and the proofing time? Grateful for your reply.
Weekend Bakers says
Hello Lawrence,
Can we ask what flour you are using and what the protein content of that flour is?
Is the mixer doing its work properly? If the dough is too liquid and not like ours in the video, you could try and use a few % less water.
We do not make the 100% sourdough version ourselves, it is quite elaborate if you want to do it well. But there are several recipes to be found on the web that will give you excellent instructions. We can recommend looking at this one: www.wildyeastblog.com/panet…et-starter
Lawrence Leason says
Hi there
Thanks for your reply. I’m using Shipton Mill No. 4- it’s a strong flour ( I believe around 12%).I use generally this as my main white flour in sourdough. Yes it’s REALLY watery and had to add a lot more flour later to make it workable. I even wondered if there was a typo in the final dough flour amount?! Maybe I’ll try again with a Canadian only flour of around 14%. Thanks for the tip on the sourdough formula.
And thanks you again for your fabulous website.
Weekend Bakers says
Thank you Lawrence! Yes, we think you should definitely try the Canadian strong flour. This will give you more strength in your dough and possibly a different liquid absorption. There is no typo, but depending on the flour you use, there will always be small adjustments (there can even be between sacks of flour of the same brand, because of the weather or indoor climate). This is why we try to show and describe what our dough looks like, so this can be your aim, rather than the exact amount in the recipe.
We hope you will get your perfect panettone soon!
Kata says
After numerous so-so attempts over the years, I decided to search for panettone recipes again after obtaining a heavy-duty mixer and 00 flour from Italy. Your recipe made the best panettone, both in flavor and texture. Everything went very well according to your instruction, from the rye sourdough starter to the finished product. I especially appreciated step-by-step guidance on the rye starter, as I have failed with rye a few times in the past. The stretch and fold process was fun, and I appreciated the instructional video. I made just the one panettone and baked it a bit longer since I already have a stack of paper molds larger than indicated here. A few minor tweaks contributed to nice aromatics: I used currants (instead of raisins) macerated in brandy overnight; instead of vanilla extract, scraped a vanilla bean into the sugar, let that sit overnight; used my homemade candied orange & lemon peel leftover from last season’s christmas cake (I like the flavor but not the texture of candied peel, so I pulverized it in the vitamix); I just picked my winter crop of meyer lemons, so I used lemon zest as well as orange. I did not use diastatic malt; aside from enhanced color, do you think it provides discernible improvement to the dough? I am going to make this again soon. Grazie! –Kata
Weekend Bakers says
Hello Kata,
So great to read your comment full of feedback and excellent suggestions and tips. Great idea to pulverize the peel. With the fresh lemon zest plus orange, your panettone must be super fragrant!
About the diastatic malt: It is not needed for a great result. The rye in the culture also has an enzymatic working.
The used flour is of (way) more importance. If you think your flour / dough could use some more oomph then you can also try adding a hint of ground up vitamine C tablet to the flour. It is used as a dough (gluten) strengthener during fermentation, helping to improve the structure of the dough. This could be something to try some time.
Enjoy your baking!
Sylvia says
Compliments of the season to you, and a big thank you for this wonderful recipe! For several years, I’ve been on a mission to bake the perfect panettone … I’ve finally achieved it with your recipe. It has totally made my Xmas!!
It’s everything I’d hoped for.
However, I also have a couple of questions:
I’ve had trouble sourcing the paper moulds and ended up making my own (with baking paper & flour/water paste) which I don’t necessarily want to repeat
– Can I bake the panettone in a suitably sized caserole/pot or will the transfer of heat via the metal impact the result? If so, do you suggest adjusting temperature, or can I perhaps overcome this by wrapping the form in newspaper or similar?
– If I want to bake a larger panettone, say double the size, how would I account for it in terms of baking time/temperature?
And lastly, a comment on the cooling: I didn’t trust my home-made moulds to support the contents while hanging upside down, I tried the pillow option and gently turned the panettone a few times during cooling. It worked very well!
Thank you once again.
Sylvia
Weekend Bakers says
Hello Sylvia,
Wow, you have been creative and inventive with the recipe.
We do have some difficulty answering your questions. We cannot say what the result will be based on experience. Of course the metal will have an effect, but we would suggest starting out at the same temperature and keep a close look at it and based on this see how soon and how far you temper the oven. The outside / crust will probably be a little different. Make sure to grease the tin well too.
The baking time for a bigger panettone we guesstimate will be around 10 to 15 minutes longer, also depending on the shape.
Good luck with your project and enjoy the process!
Koen says
Hi, )
)
Thanks for the excellent recipe. After 7 hours proofing at 35degr until they touched the cling, they are in the oven now.
Too bad they are collapsed. I think I screwed it at placing them in the oven. Should have been more gentle to those sensitive cups of dough.
Hopefully the taste will not suffer (and the worst will be part of my home made vanilla ice cream bombe
Good reason to do another batch later this week or so. Not a bad thing to do in the holidays.
Merry christmas and a 2019 full of fantastic baking!
Koen
Weekend Bakers says
Hi Koen,
What flour have you been using? Maybe a case of over-proofing too. Our final proof is no more than around 4 hours with the temp ranging from 24 to 29 C.
Maybe a different high gluten flour and shorter proofing will get you to your goal.
We have used Italian Caputo flour with 12% protein with very good result.
Enjoy your baking, eating and sharing and Happy Christmas to you and your loved ones!
Marisa Pellegrini says
Weekend bakers I love your emails. Do you have a pandoro recipe on your website? I couldn’t find one. Could you please post a recipe if you have one.
Thank you
Marisa
Weekend Bakers says
Hello Marisa,
Sorry we do not. We have made Pandoro not that often and found it less interesting than the Panettone to be honest, but we will give it consideration. We will be posting a video with this recipe very soon!
Happy Holiday baking to you!
Anjali says
Trying these out now at my parents’ place without my stand mixer! Hopefully I’ve kneaded them enough. Testing out mini ones because we don’t have the right pan size. Decided to do dried sour cherries and chocolate. The dough looks good. I’m just starting the final rise. Will report back!
Weekend Bakers says
Let us know how it goes. The combination of cherry and chocolate sounds excellent. Take your time for the proofing but keep an eye on the dough for that perfect moment they need to go to the oven!
Anjali says
Worked beautifully Thanks for the recipe!
Weekend Bakers says
Thanks for the feedback Anjali, we will keep your version in mind next time we want to do a variation. Wonderful!
Antoine says
Thanks for the awesome recipe! Super excited to give this a try… I’m mixing the first dough tonight! Based on the result, I might try converting this to full sourdough (only starter) later on, although I think I’ll need to start feeding my starter with some honey to get used to a sweeter environment.
Antoine says
Amazing result! Really great recipe
Weekend Bakers says
Thank you Antoine,
Great to read your comment and glad the recipe worked for you too.
Let us know about your full sourdough honey fed version if you do try this!
Happy holiday baking!
Lesley Broadbent says
Follow up from last night – unfortunately the panettone didn’t rise enough so there must be something wrong with the mix or that I over-proved it. It was very wet and I am used to dealing with wet doughs but that’s all I can think of. Any tips would be appreciated for the next effort. The final panettone only came up to about three-quarters of the way up the waxed moulds. I was a bit unsure that there would be enough dough for 2 x 150mm panettone as stated in your recipe. Maybe that’s another reason?
Weekend Bakers says
Hello Lesley,
We do have a few questions for you. Were you able to measure the temperature of the dough or do you have an indication of the temperature while proofing?
Our molds are 13,5 cm / 5.3 inch diameter and a height of 9.5 cm / 3.7 inch. Are you saying you used molds that are 15 cm?
First guess would be that the dough deteriorated because you waited a bit too long to reach the top, but because of the size of the molds, they could not or should not proof that far with this quantity of dough…
Rita says
I have no sourdough starter. Could you recommend modifications for the first dough that don’t require one? I’m wondering about making a yeast/flour/water mix a day or two ahead? Or maybe just modifying the yeast amount?
Weekend Bakers says
Hello Rita, the sourdough is mainly there for some extra added taste / depth of flavour. However you could easily just add 10 grams of extra flour and 10 grams of extra water to compensate for the sourdough plus an extra 0.5 grams of yeast (a total of 2 grams) for the compensation of fermenting. Hope it will be great!
Rita Belserene says
Thanks!
Lesley Broadbent says
I have made these today. I proved them for 7 hours and they still didn’t reach the top of the paper moulds so had to put them in the oven. I am cooking them at the moment. Wish me luck!
Hans says
I will give it a try next weekend. Juist before Christmaseiland.
Would you recommend a bishop or a hook for kneeding?
Groet,
Hans
Weekend Bakers says
Hello Hans,
We do not understand the word bishop. Maybe a case of auto-correct? But all kneading is done with a dough hook.
Hans says
I looked it up: flat beater.
In dutch: bisschop.
I took a class from master baker Robèrt and to my surprise he uses it for wet dough.
Weekend Bakers says
Hi Hans,
Yes, we call it a ‘vlinderhaak’ (paddle attachment / flat beater), and you see it being used with very wet (90% + hydration) dough. It makes sense to use it when the dough is so wet you do not ‘get it going’ with a dough hook. And/or with bigger machines the amount of batter / dough in the bowl verses the size of the hook is probably different from the smaller consumer machines, making it necessary to use the beater sooner/more often.
With this dough, you can of course try and use the bisschop, but we advice you to switch to a dough hook if you notice the dough stays like a blob attached to the beater with no kneading action.
Sue says
Thank you for sharing this recipe. I tried it today and the Panettones were divine! I shall have to make a larger batch of them next time, as they were so more-ish.
Weekend Bakers says
Hello Sue,
Thank you for your enthusiastic feedback. Very recognizable, the panettones are eaten quicker than we can bake them. It is such a lovely crumb to sink your teeth into, so light and yet not dry at all. Always room for one more piece it seems.
Enjoy your baking and sharing this December!
Gabor Hermann says
Hi! I was bake and very-very-very delicious.
Did not you think of a completely sourdough version?
Thanx for the method!
Gabor
Weekend Bakers says
Thank you Gabor,
No, we have never done a sourdough version, so no experience to share.
Let us know if you do try it yourself!
Greg says
Working on this recipe with sourdough only.
Will know how things go tomorrow morning.
Weekend Bakers says
Very curious to know about your results Greg!